 On the 2000 Sportage, the four-wheel-drive mode may become inoperative (diagnosed either during or after replacing the knuckles and hub seals) due to insufficient vacuum being applied to the hubs. In some cases, moisture has entered the vacuum system and vacuum lines have become corroded, plugged or developed a leak.
Corrective Action:
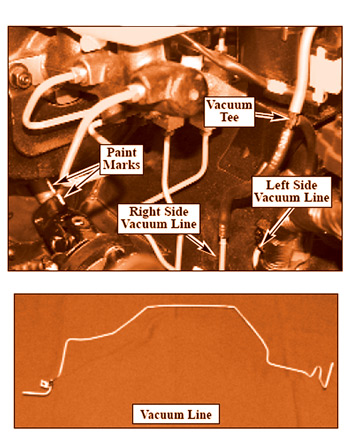
Verify that with the four-wheel-drive mode selected, vacuum is present at the T-fitting downstream from the solenoid (see Fig. 1). If not, diagnose and repair as required; otherwise use the following procedure to replace the vacuum lines:
Note: The procedure applies to the right-side line; the left side needs no further info.
Service Procedure:
1. Disconnect and remove the battery and battery tray.
2. Leaving the ground cables attached, remove the clamp bracket from the battery tray bottom and move it out of the way.
3. Remove the plastic air resonator and disconnect the throttle cable (plus A/T control cable, if equipped).
4. Disconnect the MAF and IAC connectors, and the 6 mm bolt holding the DLC and MAF brackets to the air cleaner housing.
5. Disconnect the air intake tube from the throttle body, and the MAF sensor from the air filter housing.
6. Remove the tube, duct and sensor assembly and set aside.
7. Loosen the rear engine hanger bracket and front surge tank support bracket.
8. Disconnect the coolant lines from the throttle body or (alternatively) remove the throttle body from the surge tank, but leave the coolant lines attached.
9. Remove the surge tank.
10. Cover the intake to prevent anything from falling in.
11. Mark the steering column shaft and coupling for later reference.
12. Loosen the clamps on both sides of the coupling and slide the coupling back on the intermediate shaft, disconnecting it from steering column.
13. Disconnect the vacuum hoses in the right wheel well, and from the T-fitting below the four-wheel-drive solenoid on the driver’s side of the engine compartment.
14. Pry the vacuum line loose from the four plastic retainer clips — two on the bulkhead, two on the inner wheel wells.
15. Using slack in the harness and carefully bending the vacuum line only as necessary, free the line from behind the harness bundle against the RF inner wheel well.
16. Free the vacuum line from behind the brake line attached to the (outboard position) of the differential pressure valve.
Note: Try leaving the old line intact while removing it and carefully observe the “route” you use to get it out. This will serve as “practice” that will come in handy when you install the new one.
17. Starting from the driver’s side, free up the old line and move it up until it clears the cylinder head at the location of the rear engine hanger.
18. Move and “snake” the line carefully as required to free it up and pull it out.
19. Install the new line the same way, and assemble everything in reverse order. Observe the reference mark on the steering shaft when reassembling.
20. Test-drive and check for four-wheel-drive operation.
Courtesy of ALLDATA.
For additional information, visit www.alldata.com.