By Dennis Shortino, ALLDATA editor, and Jeff Webster,
ALLDATA technical writer
 Drivers of certain Nissan vehicles may complain about one of two noises coming from the drive belt:
• A chirping or “squeak” noise is coming from the engine area, usually occurring at start-up in the morning especially in cold or damp conditions.
OR
• A squealing or chirping noise occurs when the vehicle has been driven for an extended period of time. Duplication of this noise may require operation of the engine for at least one hour.
Correcting either of these noises will involve inspecting the power steering oil pump pulley alignment and possibly realigning the pump bracket (if needed), and replacing the auto-tensioner and drive belt with the ones listed below (if needed). Refer to the steps in this Tech Tip for details.
 Applicable Models
• 2005-’08 Xterra built before 5N1AN0(***)8C 531034;
• 2005-’08 Pathfinder built before 5N1AR18(**)8C 656034;
• 2005-’08 Frontier built before 1N6AD0(***)8C 437234; and
• All vehicles with VQ40 engine ONLY.
Repair Procedure
1. Remove the engine cover following factory and/or industry standard approved practices.
2. Remove the air duct.
3. Rotate the drive belt auto tensioner counterclockwise (loosening direction of the tensioner) using a suitable tool. Caution: Do not move it clockwise.
4. Remove the drive belt.
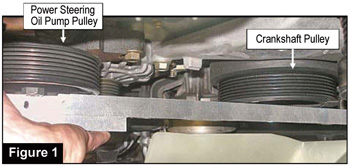
5. Using a straight edge (or other equivalent tool), visually check the power steering oil pump pulley and crankshaft pulley alignment. The pulleys should be evenly aligned (see Figure 1).
• If the pulleys are not evenly aligned, go to Step 6.
• If the pulleys are evenly aligned, go to Step 12.
6. Loosen the three bolts holding the heat shield to the right-hand exhaust manifold. Push the heat shield out of the way and secure it with a bungee cord or similar tool.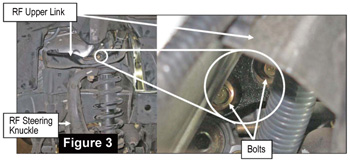
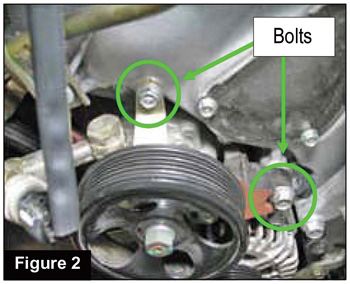
7. Loosen the two front bolts securing the power steering pump bracket to the engine block (see Figure 2).
8. Loosen the two side bolts on the bracket (see Figure 3).
9. Finger-tighten the two front bolts.
10. Finger-tighten the two side bolts.
11. Torque the bolts in the following sequence:
• Torque the lower front bolt 42-48 ft.-lb. (56.9-65.7 Nm).
• Torque the two side bolts 42-48 ft.-lb. (56.9-65.7 Nm).
• Torque the upper front bolt to 18-23 ft.-lb. (24.5-31.4 Nm).
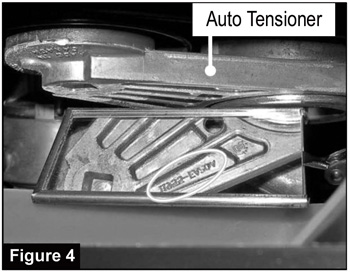 12. Check the part number on the front of the tensioner arm using a mirror (see Figure 4).
• If the part number reads 11955-EA20A, DO NOT install a new auto-tensioner.
• If the part number reads 11955-EA200, install a new auto-tensioner (P/N 11955-EA20A).
13. Install a new drive belt (P/N 11720-EA200). Do not reuse the existing belt.
14. Install the engine cover in reverse order of removal.
15. Install the air duct and exhaust heat shield.
16. Drive the vehicle to verify that the incident has been resolved.
Courtesy of ALLDATA.