Tech Tip: Jaguar Front End Creaks/Knocks on Bumps or Turns

Tech Tip: Jaguar Front End Creaks/Knocks on Bumps or Turns

A customer may report a concern of a creak or knocking noise coming from the front of the vehicle when driving over uneven ground or turning a corner. The noise may be emanating from the front left-hand side of the vehicle.

Affected Vehicle Range: 2004 and later XJ, VIN G00442, and later

A customer may report a concern of a creak or knocking noise coming from the front of the vehicle when driving over uneven ground or turning a corner. The noise may be emanating from the front left-hand side of the vehicle.

Note: Before carrying out this bulletin, refer to Technical Bulletin JTB00008 “Creak from Front Brake Caliper.” If the noise is determined to be coming from the front brake caliper, JTB00008 bulletin should be completed. The vehicle should then be re-evaluated to verify the concern has been rectified. If the concern is rectified after completing JTB00008, this tip (JTB00002 Version 2) should not be carried out.

Note: Welding or lubricating the crush tube to ­resolve this issue is not authorized by Jaguar Cars.
Should a customer express this concern, verify the source of the noise is coming from the front of the ­vehicle, and refer to the Repair Procedure detailed in this bulletin to install front crush tube screws.

Repair Procedure:
Install Front Crush Tube Screws

1. Refer to repair information on the removal of the front bumper cover.

2. Remove the sight shield moldings and radiator air defectors.

3. Remove the foam block supporting the A/C pipe to chassis frame for access to the side wall of left-hand crush tube.

Caution: Use a drill bit that has been used only to drill aluminum only  to prevent cross contamination with steel.  Figure 1

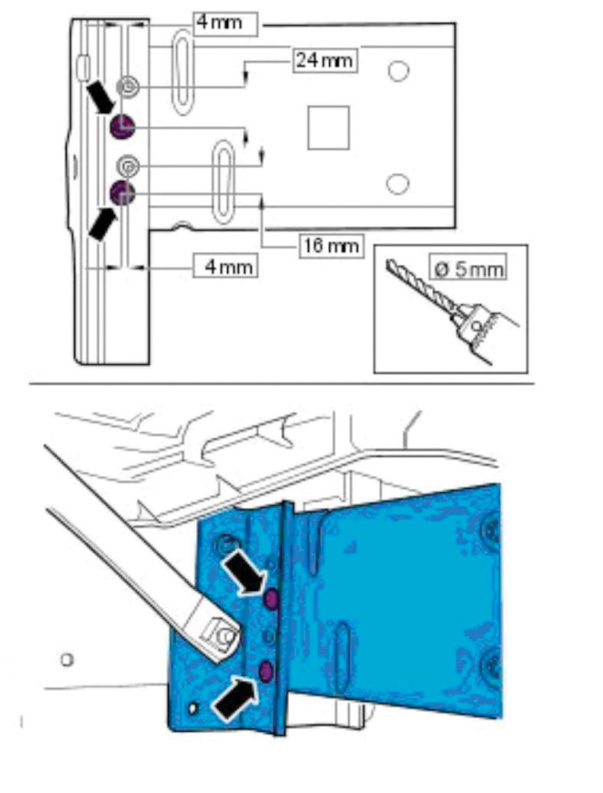
4. Mark and drill two 5 mm (0.200”) holes on both sides of the left-hand crush tube. (see Fig. 1).

5. Apply medium strength thread-locking compound to each new screw. 

6. Tighten each screw to 12 Nm (8.85 lbf.-ft.).

7. Drill two 5 mm (0.200”) holes on both sides of the right-hand crush tube.

8. Apply medium strength thread-locking compound to each new screw.

9. Tighten each screw to 12 Nm (8.85 lbf.-ft.).

10. Install the A/C pipe foam block support to the chassis frame.

11. Install the sight shield moldings and radiator air deflectors.

12. Refer to your repair information and install the front bumper cover.

Courtesy of Mitchell 1.

You May Also Like

Philips Ultinon Drive 5000 LED Lightbar Line Expands

Lumileds has expanded the Philips Ultinon Drive 5000 series to include eight models.

Lumileds has expanded the Philips Ultinon Drive 5000 series of LED lightbars to include eight models. The series now includes 10,” 20,” and 30” lightbars available in single- and double-row versions, and 40,” and 50” lightbars available in double-row configurations.

All have been built for off-road use, with scratch-resistant polycarbonate lenses, DT waterproof electrical connections, and corrosion-free, stainless steel mounting brackets, Lumileds said. Ultinon Drive LED Lightbars are engineered with single-piece assemblies that allow them to achieve an IP68 / IP69K rating for resistance to high pressure water and dust and an IK07 rating for resistance to impacts.

Mercedes-Benz Auxiliary Water Pump Diagnostics

These pumps will show up on more and more vehicles as engines become more efficient and generate less excess heat.

Timing BMW VANOS N53 And N54 

To service them, you will need the appropriate toolset to lock the crank and camshaft.

VW/Audi PCV Service

The PCV valve regulates the flow of gases from the crankcase.

Volvo Engine Service

There are many combinations for the Volvo modular engine.

Other Posts

Don’t Miss The May Digital Edition of ShopOwner

The May issue includes technical and management content and is free to download.

DMA Adds New BrakeMaster Coverage

New coverage for Ford and Chevy includes popular pickup trucks and SUVs.

Does Your Customer’s AUDI Oil Appear To Be Leaking?

Here are the service procedures required for when oil leaks from the transmission pan gasket or the transfer case.

Exhaust Gas Recirculation Operation and Diagnosis

Since exhaust gas does not burn, this lowers the combustion temperatures and reduces NOx emissions from the engine.