By Tom Purser, ALLDATA Editor, and Jeff Webster, ALLDATA Technical writer
Some Jeep Grand Cherokee owners may complain of an intermittent MIL illumination. If you retrieve DTC P1499 – Hydraulic Fan Solenoid Circuit while diagnosing the problem, this Tech Tip describes how to complete the repair by replacing just the solenoid, not the complete cooling fan module.
Affected Models: 2001-’04 Grand Cherokee equipped with hydraulic cooling system.
Diagnosis
1. Proceed with this bulletin only if the cause of the MIL illumination is due to DTC P1499 – Hydraulic Fan Solenoid Circuit Fault.
2. If the diagnostic procedures determine that the hydraulic fan solenoid is at fault, then perform the Repair Procedure.
Note: The hydraulic fan solenoid listed below has been released as a separate item. The complete hydraulic fan module no longer requires replacement when only the solenoid is found to be at fault.
Repair Procedure
1. With the engine off, disconnect the negative battery cable from the negative battery terminal.
2. Raise the vehicle on a suitable lift.
3. Clean the immediate area around the hydraulic fan solenoid of any debris.
4. Disconnect the electrical harness from the hydraulic fan solenoid (see Figure 1).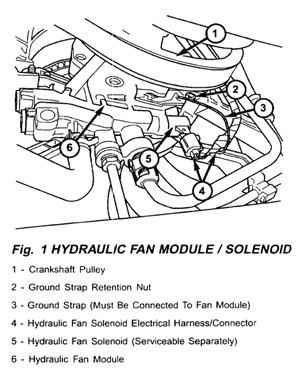
5. Have the new hydraulic fan solenoid (P/N 05102210AA) ready for installation. Make certain that the two O-rings are in place. Notice that the armature of the solenoid can rotate within the body of the solenoid (coil). A T40 torx bit is used for removal and installation (see Figure 2). 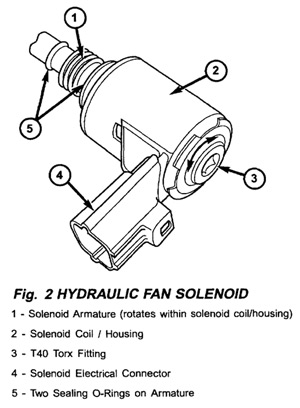
Note: If the solenoid removal and replacement steps are performed quickly, then only a very small amount of steering fluid will drip from the fan module hydraulic fan solenoid opening. The small amount of leakage should not require prior fluid removal from the power steering reservoir.
6. Hold the connector of the solenoid to prevent the solenoid body from turning, and remove the hydraulic fan solenoid from the hydraulic fan module.
7. Immediately install the new hydraulic fan solenoid. Tighten the solenoid to 16.2 Nm (12 ft.-lbs.).
8. Connect the electrical harness to the hydraulic fan solenoid.
Note: If for any reason during the repair procedure the electrical ground wire is removed from the hydraulic fan module assembly, then reconnect the ground wire and tighten the retention nut to 10 Nm (7.4 ft.-lbs.). Failure to ensure the ground strap is properly connected could result in electrostatic discharge that may damage the PCM.
9. Lower the vehicle.
10. Connect the negative battery cable to the battery negative terminal.
11. Verify the fluid level in the power steering reservoir. Top off the fluid level as necessary.
Courtesy of ALLDATA.
For additional information, visit www.alldata.com.