During winter driving, especially in the 23 “Salt Belt” states, water containing salt may accumulate in the black plastic pipe cover and/or the brackets of the wheel housing. This may cause corrosion and perforation of the rear heater pipe, resulting in coolant seepage from the rear heater pipe. To correct this concern, mass production has been changed as follows:
1. The material of the heater pipe has been changed from steel to aluminum.
2. A urethane protector has been added around the rear heater pipe, and the black plastic pipe cover for the wheel housing has been deleted.
Vehicles with this concern should be repaired using the procedure shown in this bulletin.
Applicable Model(s)/VINs:
2000-’01 MPV (equipped with rear heater) with VINs JM3 LW28**Y0100038 – 10214436 (built March 31, 1999 through Aug. 8, 2003)
2002-’03 MPV (equipped with rear heater) with VINs JM3 LW28**20300025 – 30378937 (built March 31, 1999 through Aug. 8, 2003)
Repair Procedure:
1. Secure the vehicle on a hoist.
2. Raise the vehicle and locate the rear heater pipe (rear) in the right rear wheel well.
3. Remove the black plastic pipe cover. Note: Discard the black plastic pipe cover. It will not be reused.
4. Inspect the rear heater pipe (front) and rear heater pipe (rear) for signs of coolant seepage.
Note: The rear-side bracket is more likely to be rusted. If there is no rust or rust is very light (white rust), replacement is not required.
5. Remove the seeping side of the rear heater pipe.
Note: It is not necessary to remove the front crossmember and stabilizer bar to remove the rear heater pipe (front).
6. If the rear-side of the rear heater pipe is seeping and needs to be replaced, also inspect the heater pipe attachment bracket for rust, corrosion or breakage after the rear heater pipe (rear) is removed.
7. Using a power cutting tool, cut off the top of the bracket leaving only welded bracket flanges. See Fig. 1.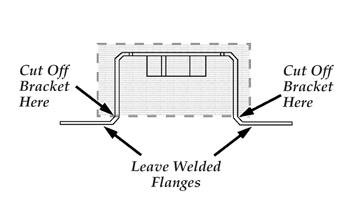
Warning: Be sure to wear safety goggles when using power cutting/grinding tools.
Caution: After cutting the top of the bracket off, grind any sharp edges off the flanges.
8. Place the new bracket on top of the welded flanges. See Fig. 2.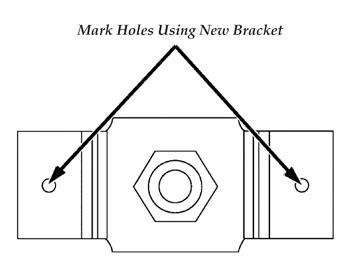
9. Mark the holes using the new bracket as a template.
10. Using a 4 mm drill bit, drill two holes.
11. Apply rust-preventative sealer inside the new holes.
12. Attach the new bracket to the body using two self-tapping screws.
13. Once the bracket is secured, apply silicon-based sealer on top of the screws and flanges. See Fig. 3.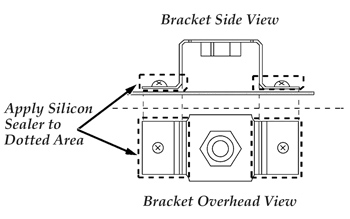
14. Install the new rear heater pipe (rear), securing it to the bracket.
15. If the rear heater pipe (front) is also seeping and needs to be replaced, install a new one. Note: It is not necessary to remove the front crossmember and stabilizer bar to install the rear heater pipe (front).
16. Add coolant to the cooling system. See Fig. 4. 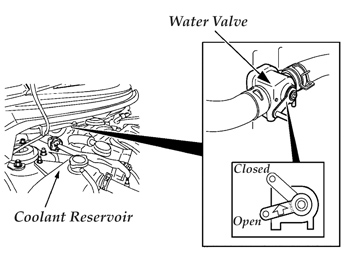
Note: If the vehicle is equipped with a water valve (under hood), ensure the valve is in the “open” position. If the valve is closed, the front heater will not provide heat. Refer to service bulletin 07-004/04 (MPV – Lack of Warm Air From Front Heater) issued Aug. 02, 2004 for additional information.
17. Verify proper heater operation once the repair is complete.
18. Complete an “Authorized Modification Label” with “SSP65” written on the sticker and affix it to the vehicle’s hood.
Courtesy of ALLDATA.