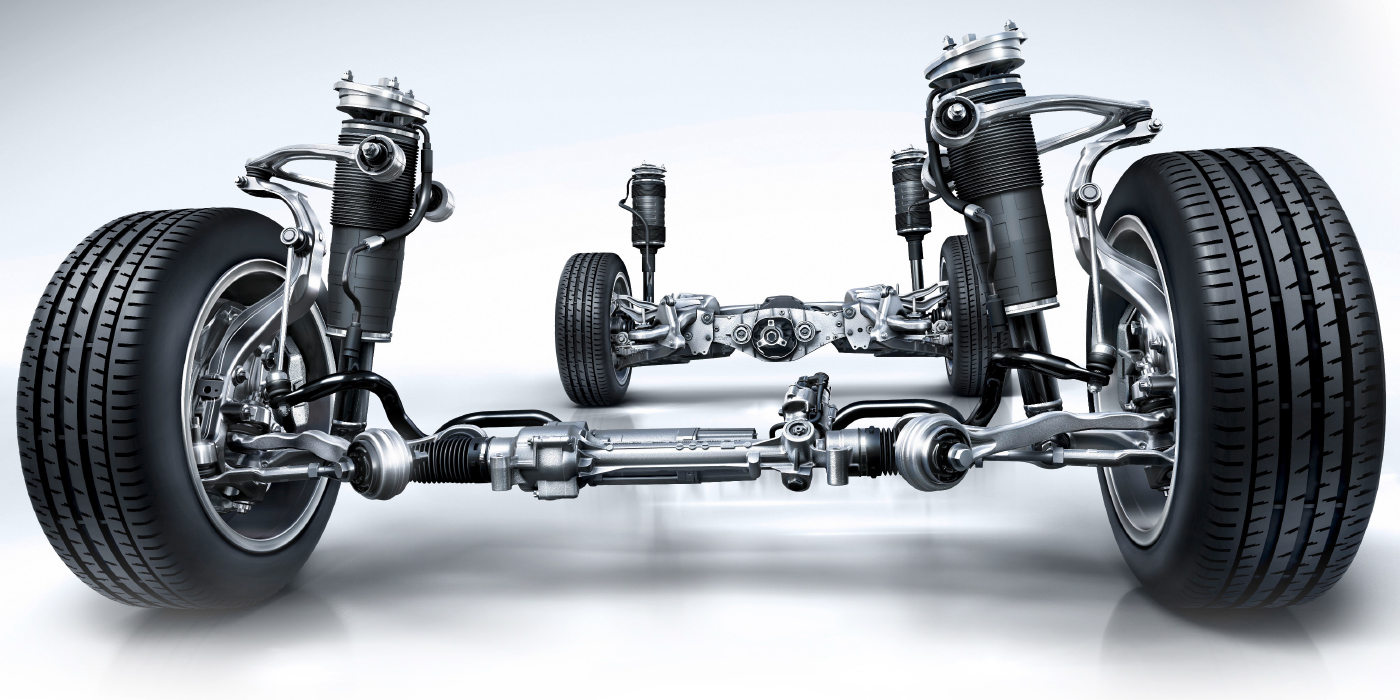
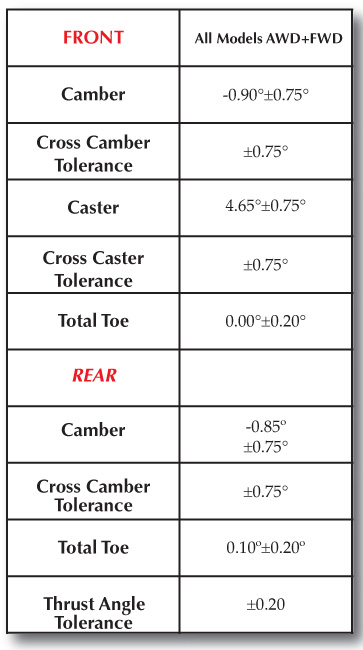
The front suspension is a coil-over strut system mounted to a full perimeter isolated cradle. Camber is adjusted by either elongating the strut’s lower mounting holes or installing a cam kit in the upper bolt hole. The caster is not adjustable. The angle given is just for reference. But, it can be used to diagnosis a bent cradle or frame damage.
In the rear, these vehicles have a linked H-arm independent suspension mounted on a sub-frame. Adjustments for camber and toe are made with factory-installed cams.

Before You Start
• Alignment should be performed with a full tank of gas, even if the vehicle has a rear leveling air suspension.
• Before you say you can align this vehicle, make sure your wheel clamps can handle 19” or larger wheels.
• All these vehicles come standard with an ESC system that requires recalibration or reset with a tool that communicates through the OBDII port after wheel alignment has been performed.
• If a customer is complaining of a clunk or knock noise when turning, check the steering rack bushings. GM has updated bushings. See TSB 10-02-32-001A.
• Some drivers may complain of a squawk- or creak-type noise coming from the front suspension in cold temperatures. This noise will most likely be heard during light to medium suspension travel. The noise may occur with the vehicle traveling straight or during turns. The cause of this may be due to the inside diameter of the front strut jounce bumper rubbing against the piston rod of the strut, creating a slip-stick condition. See TSB 09-03-08-004B.
• The lugnut torque is 140 ft/lbs for all models.
• The lower ball joints and tie-rods require final tightening with a torque angle gauge. On the lower ball joints, tighten the mounting nut to 30 ft/lbs plus 120 degrees. It is almost impossible to get a socket and torque angle gauge over the nut and stud, but it can be done with a combination wrench and Allen wrench. Just remember, 120 degrees equals approximately two wrench flats. For tie-rod studs, Tighten the nut to 22 ft/lbs and 120 degrees.
 Front Camber Adjustment
Remove the strut lower bolt in order to inspect for an oblong strut lower hole. If the strut lower hole is oblong, loosen the strut upper bolt in order to allow for camber adjustment. If the strut lower hole is not oblong, you can install a cam bolt in the upper hole or elongate the lower hole. GM advises that the strut should be removed from the vehicle.
Secure the strut in a vise and file the strut lower hole laterally in order to allow for camber adjustment. Typically, either method will allow for ±1.75 degrees of camber.
Tighten the strut bolt nuts to 83 ft/lbs.
Front Toe Adjustments
Three Notes:
• Verify that the number of threads showing on both inner tie rod ends are approximately equal. Rotate the inner tie rods in order to obtain the proper toe angle of 0 degrees;
• Tighten the left and right tie rod jam nuts to 50 ft/lbs; and
• Remove the outer boot clamp before making an adjustment.
Rear Camber Adjustment
1. Loosen the adjuster cam nut on the upper control arm.
2. Using a wrench to rotate the adjuster bolt, adjust the cam to specifications. Ensure that the camber settings have not changed after torquing the adjuster nut to specifications. Readjust if necessary.
3. Using a wrench to hold the adjuster bolt, tighten the adjuster nut to 103 ft/lbs.
4. Check the toe alignment and adjust if required.
Rear Toe Adjustment
Make any adjustments to camber before setting toe.
1. Loosen the adjuster nut on the toe link.
2. Using a wrench to rotate the adjuster bolt, adjust the cam to specifications.
3. Check toe and camber specifications to ensure that the toe settings have not changed after torquing the adjuster nut to specifications. Readjust if necessary.
4. Using a wrench to hold the adjuster bolt, tighten the adjuster nut.
Tighten the nut to 103 ft/lbs.