A Jaguar S-Type owner may complain of a ticking or bubbling noise coming from behind the fascia/instrument panel when using the climate control system. The noise may be the result of one or more of the climate control blend door actuators giving incorrect position feedback to the climate control module, causing the blend doors to continually search for their correct position and causing the noise.
To correct the condition, follow the Repair Procedure to replace all four blend door actuators.
Applicable Model: 2006-’07 S-Type, VINs: N53000-N91220
Repair Procedure:
Remove the Blend Door Actuators:
1. Remove the glove compartment.
2. Disconnect the battery ground cable.
3. Remove the recirculation blend door actuator (see Fig. 1): Disconnect the electrical connector and the control rod. Remove the retaining bolts and the actuator from the housing.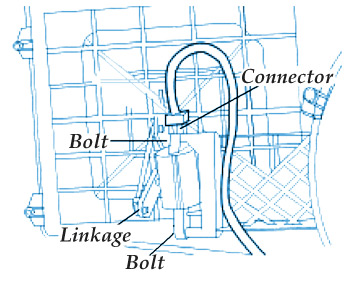
4. Remove the left-hand front footwell duct.
5. Reposition the in-vehicle temperature sensor venturi pipe.
6. Remove the footwell vent/duct blend door actuator (see Fig. 2): Disconnect the electrical connector. Remove the retaining bolts and the actuator from the housing.
Caution: Place the instrument cluster face up, taking care to protect the instrument cluster from damage.
7. Remove the instrument cluster. 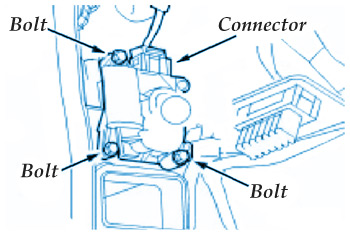
8. Remove the defrost vent/register blend door actuator (see Fig. 3): Disconnect the electrical connector. Remove the retaining bolts and the actuator from the housing.
9. Remove the instrument panel blend door actuator (see Fig. 4): Disconnect the electrical connector and the remote linkage. Remove the retaining bolts and the actuator from the housing.
Install the New Blend Door Actuators:
Caution: Ensure the new actuators are fully meshed with the driven flaps before tightening the bolts. 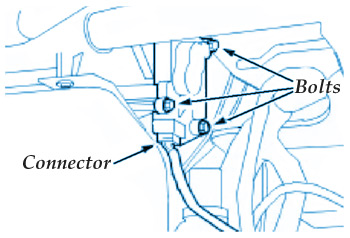
1. Install the new instrument panel blend door actuator (P/N XR8 57887) (see Fig. 4): Insert the actuator into the housing. Install the retaining bolts. Connect the remote linkage and the electrical connector.
2. Install the new defrost vent/register blend door actuator (P/N XR8 57885) (see Fig. 3): Insert the actuator into the housing. Install the retaining bolts. Connect the electrical connector.
3. Install the instrument cluster. 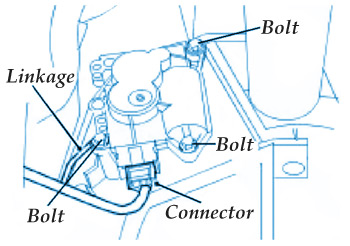
4. Install the new footwell vent/duct blend door actuator (P/N XR8 57886) (see Fig. 2): Insert the actuator into the housing. Install the retaining bolts. Connect the electrical connector.
5. Correctly position the in-vehicle temperature sensor venturi pipe.
6. Install the left-hand front footwell duct.
7. Install the new recirculation blend door actuator (P/N XR8 57888) (see Fig. 1): Insert the actuator into the housing. Install the retaining bolts. Connect the control rod, and connect the electrical connector.
8. Install the glove compartment.
9. Connect the negative battery cable.
10. Drive the vehicle to confirm the repair.
By Ed Dorowski, ALLDATA editor and Jeff Webster, ALLDATA technical writer.