By Ed Dorowski, ALLDATA editor, and Jeff Webster, ALLDATA technical writer
A Jeep owner may complain of a chirp-like sound from the serpentine accessory drive belt. This condition may be most noticeable when the engine is at idle and during high ambient temperatures.
Previous drive belt replacement(s) may have temporarily eliminated the drive belt chirp-like sound, with the sound returning after low mileage accumulation on the replacement belt. Correct this condition by installing a new serpentine accessory drive belt and, on some vehicles, revising the routing of the drive belt.
Applicable Models: 2003-’05 Liberty and Cherokee, and 2003-’06 Wrangler
Note: This bulletin applies to vehicles equipped with a 2.4L engine built prior to Jan. 1, 2006 (MDH 0101XX).
Parts Information
Accessory Drive Belt (2.4L without A/C): 04892519AB
Accessory Drive Belt (2.4L with A/C): 04892520AB
Diagnosis
1. Verify that the front face surface of the power steering pulley center hub is flush with the end of the power steering pump shaft.
2. What model year is the vehicle?
a. If the vehicle is a 2006 model, perform Section A – Replace Belt.
b. If vehicle is 2003 to 2005 model, perform Section B – Remove Idler Pulley and Replace Belt.
Repair Procedure
Section A – Replace Belt
Caution: Do not let the belt tensioner snap back to the freearm position — severe damage may occur to the tensioner.
1. Disconnect and isolate the negative battery cable from the battery.
2. Rotate the belt tensioner arm until it contacts the stop to remove tension on the belt.
3. Remove the old drive belt and discard.
4. Slowly rotate the belt tensioner arm into the free arm position.
5. Check the condition of all pulleys
6. Temporarily route the new drive belt around all pulleys except the top left (driver side) idler pulley.
7. Rotate the belt tensioner arm until it contacts its stop position.
8. Route the new drive belt around the top left idler pulley and slowly let the tensioner arm rotate into the drive belt.
Note: Belt tension is not adjustable. Belt adjustment is maintained by the automatic (spring-loaded) drive belt tensioner.
9. Verify that the new drive belt is seated properly to all pulleys.
10. Connect the negative battery cable to the battery.
11. Set the clock to the correct time.
Section B – Remove Idler Pulley and Replace Belt
Note: This repair involves a revised drive belt routing.
The new drive belt routing may differ from the respective service information drive belt schematic.
Caution: Do not let the belt tensioner snap back to the freearm position — severe damage may occur to the tensioner.
1. Disconnect and isolate the negative battery cable from the battery.
2. Rotate the belt tensioner arm until it contacts the stop to remove tension on the belt.
3. Remove the old drive belt and discard.
4. Slowly rotate the belt tensioner arm into the free arm position.
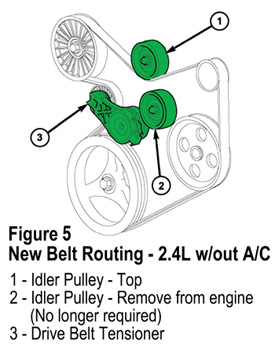
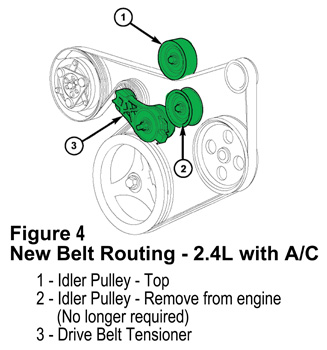
5. Remove and discard the small idler pulley that is closest to the belt tensioner center hub. Refer to item 2 in Figure 1 – “New Belt Routing – 2.4L with A/C” or in Figure 2 – “New Belt Routing – 2.4L w/out A/C.”
6. Check the condition of all pulleys.
7. Install the new serpentine accessory drive belt using the revised drive belt routing in this Tech Tip. The small idler pulley (Item 2) closest to the belt tensioner center hub will no longer be used
(Figures 1 and 2).
8. Temporarily route the new drive belt around all pulleys except the top left (driver side) idler pulley.
9. Rotate the belt tensioner arm until it contacts its stop position.
10. Route the new drive belt around the top left idler pulley and slowly let the tensioner arm rotate into the drive belt.
Note: Belt tension is not adjustable. Belt adjustment is maintained by the automatic (spring loaded) drive belt tensioner.
11. Verify that the new drive belt is seated properly to all pulleys.
12. If present, remove the old underhood accessory drive belt instruction label from the vehicle engine compartment.
13. Connect the negative battery cable to the battery.
14. Set the clock to the correct time.
Courtesy of ALLDATA.