Tech Tip: Replacing Kia Sorento Coolant Reservior

Tech Tip: Replacing Kia Sorento Coolant Reservior

Certain Sorento vehicles may overheat due to small cracks found on the bottom of the coolant reservoir due to repetitive temperature and pressure fluctuations. The new and improved coolant tank allows some expansion and contraction found in many pressurized cooling systems. This bulletin describes the proper service procedure for identifying and replacing the coolant reservoir tank.

Certain Kia Sorento vehicles may overheat due to small cracks found on the bottom of the coolant reservoir due to repetitive temperature and pressure fluctuations. The new and improved coolant tank allows some expansion and contraction found in many pressurized cooling systems.

This bulletin describes the proper service procedure for identifying and replacing the coolant reservoir tank.

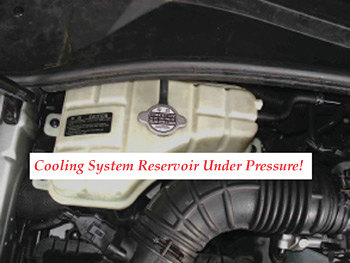
Note: The previous design (P/N 25430 3E200) is ribbed; the new design (P/N 25430 3E200QQK) is ­reinforced. Verify that the reservoir has not been previously replaced by reaching underneath and checking the lower surface of the reservoir. figure 1
Effective Vehicle Information: 2003-’05 Sorento vehicles produced from June 30, 2002 to Oct. 3, 2004.

Repair Procedure:

1. Raise the hood and locate the coolant reservoir, cover the cap with a cotton shop towel and slowly ­remove the reservoir tank cap. See Fig. 1.

Warning: ­Engine coolant is flammable at certain temperatures. If coolant is spilled during the service procedure, all residual coolant must be removed from all surfaces before releasing the vehicle back to the customer. Make sure that the engine has cooled down to outside temperature before starting the ­repair to avoid being burned by hot coolant.figure 2
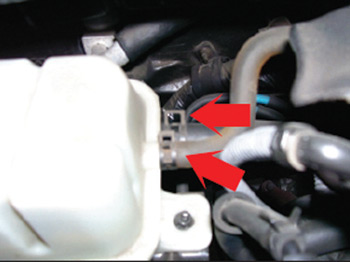
2. Use a suction pump to remove the coolant or ­install a rubber plug or equivalent to prevent the coolant from leaking completely out of the coolant reservoir tank when the hoses are removed.

a. Remove the two hose clamps and hoses from the coolant reservoir tank. See Fig. 2.

b. Transfer the overflow hose from the old to the new tank

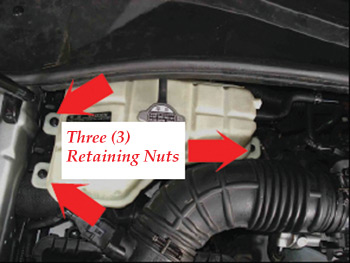
3. Remove the three retaining nuts holding the coolant reservoir tank. See Fig. 3.

a. Drain the remaining coolant into the transfer container.

b. Install the new replacement tank to the vehicle, tighten the retaining nuts to 84-108 in.-lbs. (9.4-12.2 Nm).

c. Connect the rubber hoses and clamps as ­removed.Figure 3

d. Fill the coolant reservoir to the correct level and  ­install the pressure cap. Coolant should be a 50/50 mixture, unless otherwise specified on the container.

Courtesy of Kia Motors America, Inc.

You May Also Like

VW/Audi PCV Service

The PCV valve regulates the flow of gases from the crankcase.

Positive crankcase ventilation (PCV) systems have been on just about every vehicle since the late 1960s. The systems route crankcase vapors and droplets into the intake manifold so they are burned in the combustion chamber or catalytic converter. 

The PCV valve uses the vacuum from the intake manifold to regulate the flow of gases from the crankcase. The pintle or ball inside the valve moves in response to the pressure difference between the crankcase and the intake manifold. The valve is typically located between the throttle body and cylinder head on a runner for the intake manifold.

Volvo Engine Service

There are many combinations for the Volvo modular engine.

Servicing Mercedes-Benz AMG Brakes

Take a look at some of the things you need to know in order to service the brakes on a Mercedes-Benz AMG vehicle.

AUDI Outside Air Temperature Readings

Incorrect readings can be avoided.

Mercedes-Benz ABC Suspensions

The system provides great ride & handling, but it can be complicated to service if you do not have the right training.

Other Posts

KIA Barely Runs

Check the low-pressure pump (LPP) supply fuel pressure to the high-pressure pump (HPP).

Don’t Miss The April Digital Edition of ShopOwner

The April issue includes technical and management content and is free to download.

ZF Expands SACHS CDC Shock Line for U.S., Canada

The release expands ZF’s line by more than 70% reflecting growing demand for advanced damping technology in the aftermarket.

Philips Announces Xperion 6000 LED Under Hood Work Light

It features a motion detection switch that allows mechanics to turn the light on and off with a wave of their hand.