By Chris Burton, ALLDATA editor and Jeff Webster, ALLDATA technical writer
Some Mazda6 drivers may complain that the seat warmers turn off too early or may not heat to their satisfaction. The operating temperature of the new seat warmer has been increased on later vehicles by 14° F (on average) to address this concern. Follow the steps in this Tech Tip to correct the condition.
Applicable Model: 2003 Mazda6 vehicles (equipped with seat warmers) produced before April 20, 2003.
Repair Procedure
Caution: It is recommend an upholstery shop or technician with upholstery experience perform this repair.
Note: Procedures outlined below are for driver’s seat with power seat option. Non-powered driver’s seat and passenger seat is similar.
1. Verify the customer’s concern. 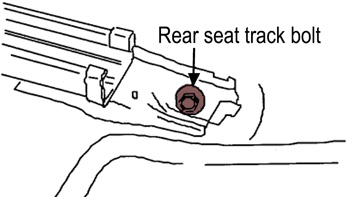
2. Record the customer’s radio pre-set stations.
3. Raise the driver’s seat bottom to its highest position by lifting the seat control lever upward.
4. Move the seat to the rearward-most position to gain access to the front seat frame bolts.
5. Remove the two front seat frame bolt covers by pulling forward to disengage the retainers.
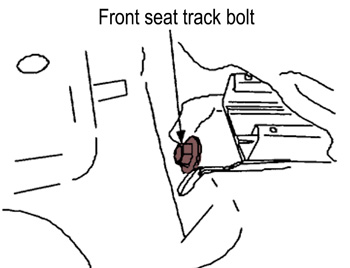
6. Remove the two front seat track bolts (see Figure 1).
7. Move the seat to the forward-most position to gain access to rear seat frame bolts.
8. Remove the two rear seat frame bolt covers by pulling rearward to disengage the retainers. 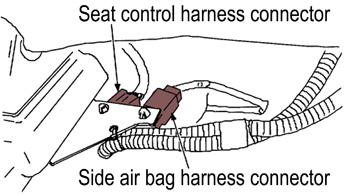
9. Remove the two rear seat track bolts (see Figure 2).
10. Disconnect the negative battery cable and wait for more than one minute to discharge the air bag system.
11. Detach the seat control connectors and yellow side air bag module connector (if equipped) from the bracket by depressing the tips inward.
12. Disconnect the seat control harness connector (see Figure 3).
13. Disconnect the yellow side air bag module harness connector (if equipped), (see Figure 3).
14. Carefully remove the seat from the vehicle and place it upside down on a clean blanket or fender cover.
15. Remove the rear of the seat cushion trim by detaching the seat cushion trim j-hook from the metal tabs at the rear of the seat cushion frame (see Figure 4). 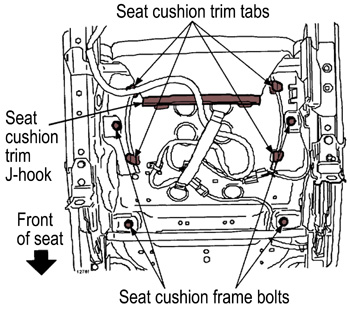
16. Remove the four seat cushion frame bolts (see Figure 4).
17. Detach all of the connectors attached to the seat cushion frame.
18. Remove the seat cushion/ frame assembly from the seat assembly and place it upside down on a clean blanket or fender cover.
19. Remove the sides of the seat cushion trim attached at the tabs on the seat cushion frame.
20. Pull the seat cushion trim off of the seat cushion.
21. Remove the seat cushion trim from the metal frame by cutting off all “hog” rings (see Figure 5).
Caution: Use care not to damage the seat cushion trim; it will be reinstalled onto the new seat cushion.
22. Obtain the new seat cushion.
23. Reinstall the old seat cushion trim onto the new seat cushion. 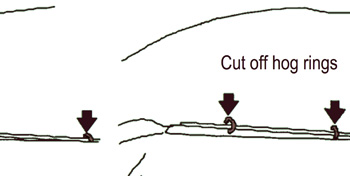
24. Using the new hog rings, reinstall the seat cushion onto seat cushion frame (see Figure 6).
Caution: To prevent damage to the seat cushion trim, make sure to position the sharp tips of hog rings downward (see Figure 6).
25. Inspect the seat cushion trim for any wrinkles and correct if necessary.
26. To reinstall the seat cushion onto the seat assembly, reverse the removal procedures.
27. To reinstall the seat assembly into the vehicle, reverse the removal procedures. Seat frame bolt torque: 27-39 ft.-lb. (37-53 Nm).
28. Repeat Steps 3-27 to repair the passenger’s side seat. 
29. Reconnect the negative battery cable.
30. Confirm the seat warmer operation.
31. Re-enter the customer’s radio pre-set stations.
Courtesy of ALLDATA.