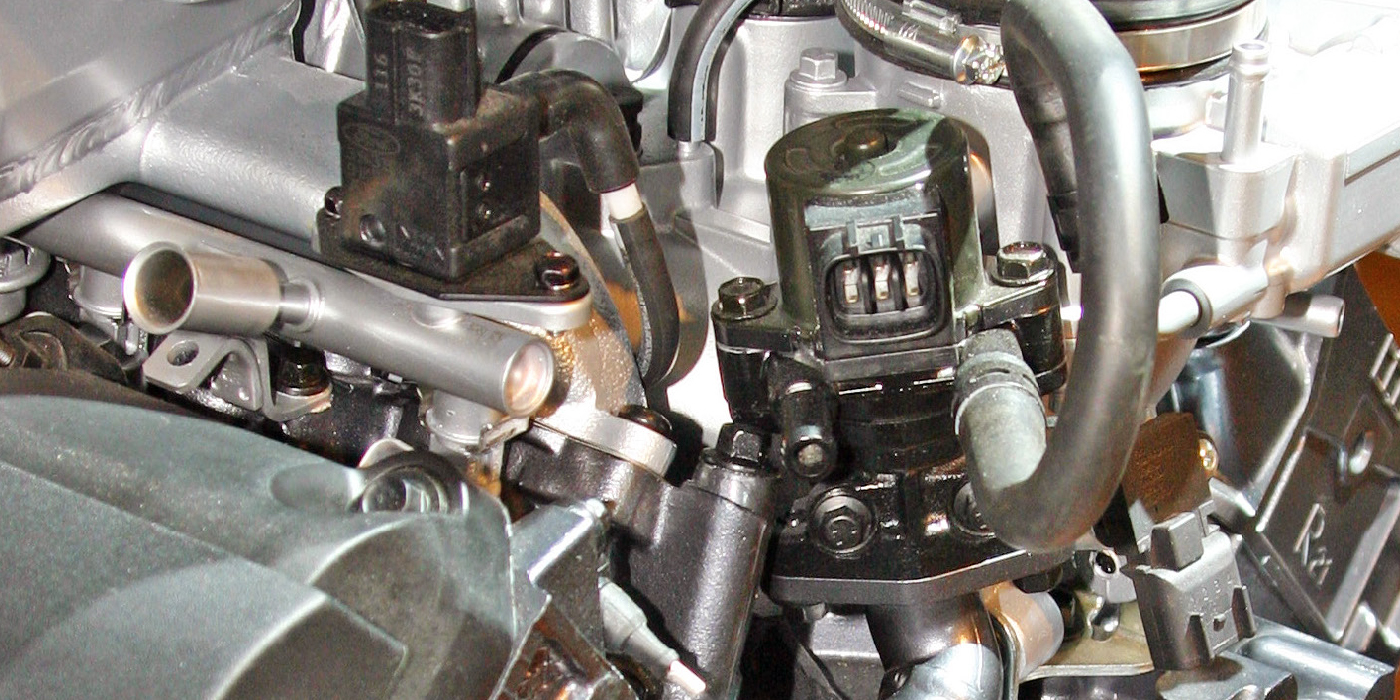
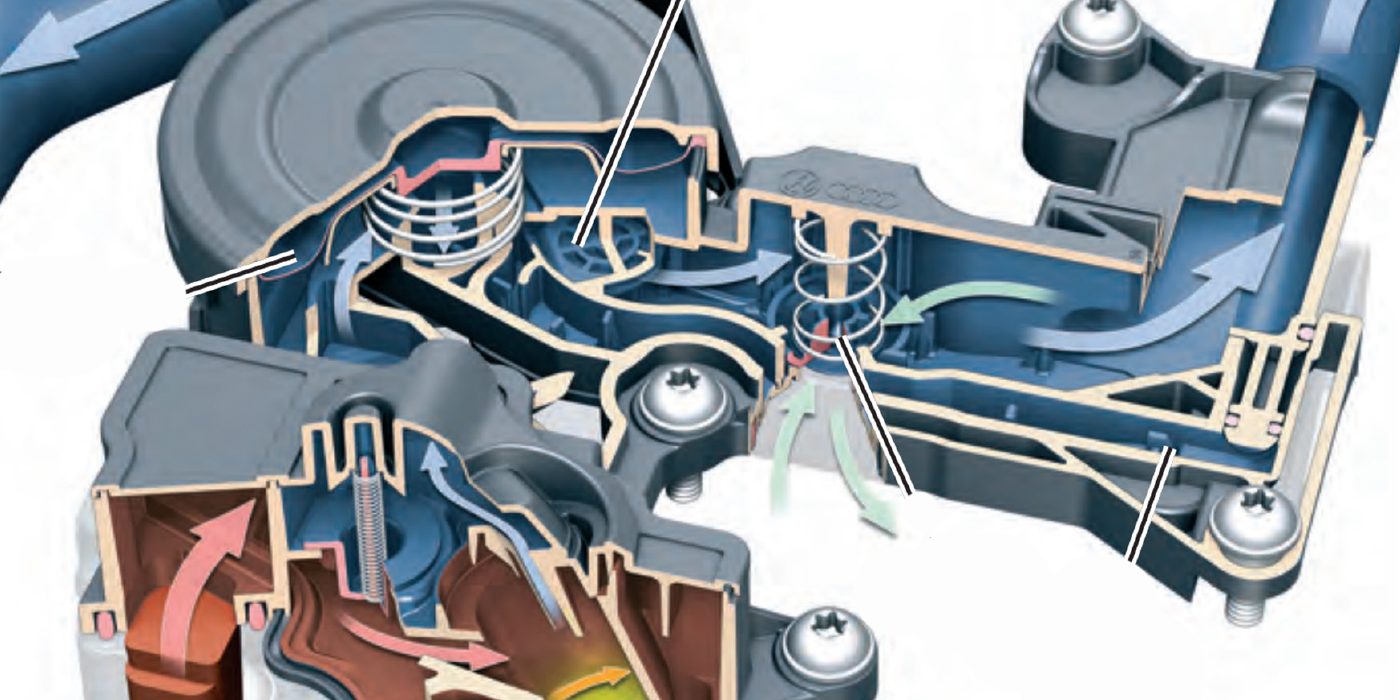
An often overlooked, but critical system within your vehicle is the accessory drive system. In the basic configuration, this includes a pulley on an engine powered shaft, a pulley on a driven accessory and a belt. More complicated configurations include the engine powered shaft and pulley, multiple accessory drive pulleys (generator, water pump, fan, air conditioning compressor, air compressors, power steering pump, hydraulic pump, etc.), idlers, a belt tensioning device or tensioner, and a belt. Accessory drive systems are not overly complicated and are not outwardly high technology, but failure to inspect and care for the system will result in vehicle failure and potentially high repair costs. To avoid this result, it is necessary to be knowledgeable in the inspection techniques and indicators that predict approaching problems.
The belt, by design, is the most likely component of the drive system to actually fail. It is much more advantageous for the belt to slip or break than to break other system components. Though the belt is obviously the failed part, it may simply be the result of other problem components in the drive system that have caused belt failure. The “V-Ribbed” belt common on most vehicles produced in the last 10 years is a highly developed product and most OEM and high quality aftermartket belts are constructed of textiles and rubber compounds based on EPDM polymer. This construction provides for high temperature resistance to 250ºF+, low temperature resistance of -30ºF, good wear resistance, moderate oil resistance and good flexibility. The anticipated failure mode of this type of belt is rib cracking. Failure modes other than rib cracking which when allowed to progress eventually results in rib “chunk-out” and belt breakage, are typically system related and not directly attributable to the belt.
When performing accessory drive system service work, it is highly advised that you inspect the system prior to removing the belt. There is much to be learned from this inspection that will assist in identifying current and potential problems. Additionally, there may be no need to remove the belt if the visual checks meet expectations.
1. Inspect the system to make sure all components are aligned. Poor alignment is the number one cause of belt noise. It can also cause premature wear, belt mistracking or rib skipping, and belt edge wear and fraying. Sight down the side of the belt to make sure the edge of the belt does not make any bends toward or away from the engine. Any deviation you can detect with your eye is too much. Many systems with excess misalignment can be corrected by accessory mount shimming, shifting the position of the pulley on the accessory shaft or loosening the accessory mount points and varying the sequence of tightening.
2. Inspect the belt tensioning device. Make sure the tensioning device pulley is parallel to the belt path. The tensioner arm will typically be parallel to the belt path. If the pulley and or tensioner arm is not parallel, this will indicate a bushing wear problem internal to the tensioner or the tensioning pulley bearing may have excessive wear and “free rock.” Also look at the face and outer surface of the tensioning device. There may be notches or protrusions on the arm and/or the outer case that are position indicators. Normally the indicator on the tensioner arm will be located between two indicators on the tensioner case. If this is true, the tensioner is in the desired working range. If the arm indicator is at or near one of the case indicators, the tensioner is nearing the end of available travel and will soon stop providing the correct belt tension.
3. Make sure the belt is properly engaged in all grooved pulleys. If all pulley grooves are not engaged with the belt, the installed belt either had the wrong number of ribs or the belt has skipped position in the pulley. A belt that has skipped has been irreparably damaged and should be replaced immediately.
4. The belt should be centered on all flat or backside pulleys. If the belt is running toward the front or back of a flat pulley, there is a good possibility of poor alignment or the bearings in the backside pulley are nearing the end of useful life.
5. Contaminants in the drive system will cause belt damage and premature wear. Make sure the grooves are clean and not fouled with dust, dirt, grease, rocks, etc. Large debris will cut and gouge the belt. Small and packed debris will prevent the belt from properly seating in the groove and detract from power transmission capability. Fix all lubricant and coolant leaks. Lubricants will reduce coefficient of friction between the belt and pulley inducing belt slippage and eventually attack the rubber compound. Coolant increases the potential for the belt to make noise.
6. Inspect the belt located on a backside pulley. The ribs of the belt are elongated in this position and any rib cracks are magnified. If rib cracks are detected you should probably remove the belt for further inspection. Locate a belt span where the backside of the belt can be easily observed. The backside of the belt, flat side, should be smooth without debris penetration from the rib side. The backside of the belt should not show fraying or excessive wear.
7. Start the engine and listen with a focus on the accessory drive system. Squeaks indicate belt slippage or misalignment induced belt chirp. Squeaks and squeals can be created by insufficient belt tension requiring tension adjustment, tensioner replacement or in the case of a stretch belt, belt replacement. Chirp at idle speeds, particularly in high humidity conditions, is misalignment induced.
If the previous inspection detects a potential problem, it is advisable to remove the drive belt for a more detailed evaluation of the accessory drive system components.
1. Once the belt has been removed, it is much easier to determine if the belt should be replaced. First look at the flat or backside of the belt. If you see a splice opening indicated by a crack or loose fabric across the belt width, wear through the backing material to the tensile member line (lighter colored filaments running the length of the belt), or cracks in the back of the belt that progress through the thickness of the belt to the tensile member line, the belt should be replaced. Secondly, inspect the edge of the belt. Pay close attention to the lighter colored tensile member. If the tensile member is severely frayed or protrudes from the edge of the belt more than 0.5 inches, replace the belt. Lastly, inspect the rib side of the belt. Random cracking indicates the belt may be replaced, but failure is not imminent unless the crack has progressed in depth to the point that the tensile member can be seen through the crack when the belt is bent. If the cracking has progressed to the point that pieces of the rib are missing, replace the belt. Also look for a crack in all the ribs in a straight line diagonally or straight across the belt width. If this is observed, replace the belt.
2. With the belt removed, the tensioner can be inspected more closely. Rotate the tensioner pulley by hand and feel for bearing roughness. A rough bearing indicates potential for immediate failure and the tensioner should be replaced. While rotating the pulley, look for an accumulation of foreign material on the pulley surface. Remove any foreign material. With the proper tool, move the tensioner arm as if you were installing a new belt. Move the arm through the full range of available travel. By feel you can detect if there is roughness or sticking of the tensioner arm during this movement. If sticking is detected, replace the tensioner. As a final step, attempt to move the tensioner are toward and away from the engine. If looseness is detected, the bushings in the tensioner have worn excessively and the tensioner should be replaced.
All accessory and idler pulleys should be hand rotated to determine bearing smoothness and the need for replacement. While rotating, make sure all pulley surfaces are clean and free of debris and try to move the pulleys fore and aft to make sure the mounting is tight and there is minimal axial movement of the pulley, which might cause misalignment. With your hands, move all idlers fore and aft and check for free rock. Excessive movement indicates a bearing or alignment problem and the idler should be replaced.
Accessory drive systems have made many advancements in recent years and life expectancy of a properly designed and executed accessory drive is more than 100,000 miles. Because the individual components of an accessory drive function as a system, reliant on every component to perform as expected, it is beneficial, if not essential, to replace the wearing components of the system simultaneously. When a wearing component, belt, tensioner or idler needs replacement, it is advisable and economically prudent to replace all.
Courtesy of Veyance.