PADS
The Maxima uses a two-piece “floating” shim on the backs of the pads. Nissan recommends applying a thin coating of a silicone-based grease to the rear of the pad and to both sides of the shim, and attach the inner shim and shim cover to the inner pad, and the outer shim and outer shim cover to the outer pad.
Replacement of the pad retainers or abutment clips is recommended for every pad swap. The wear limit of the front and rear pads is 2 mm and new front pads have 8.5 mm of friction material.
It has been reported that the Maxima is sensitive to friction materials and a friction material drastically different from the original material will cause either a hard or soft pedal.
Rotors
When replacing rotors or machining rotors, measure runout and thickness variation. Failing to do this can result in a comeback. The runout limit in the front is 0.05 mm (0.0020"). Thickness variation in measured in eight locations should be below 0.015 mm (0.0006").
Front rotors have a new thickness of 28 mm (1.10"), and a discard or minimum thickness of 26 mm (1.02"). The rear rotors new thickness of 9.0 mm (0.350") and a minimum thickness of 8.0 mm (0.310").
Bleeding The System
Nissan recommends disconnecting the negative battery terminal for bleeding the brakes. But, it is unclear if this procedure is to prevent human error-induced accidental key-on ABS activation or if this is to prevent a condition that may occur during bleeding.
Any method can be used for bleeding including manual, gravity or power bleeding. Tighten bleeder to 8 Nm (69 inch lbs.).
Bleed the brake hydraulic system air bleeder valves in the following order: right rear, left front, left rear and right front.
Parking Brake Adjustment Adjustment
On the Maxima, the parking brake is in the hub of the rear rotors. In the rear, an adjustment can be made by turning the adjuster until the wheel locks and backing off by five or six notches. After this adjustment is completed, make sure the wheels have no drag.
To adjust the parking brake lever, remove the cover from below the handle. Fully engage the control lever before starting the steps below.
1. Loosen the parking brake cable adjusting nut and fully release the control lever.
2. Adjust clearance of the rear parking brake shoes.
3. Depress the brake pedal fully more than five times.
4. Make sure that no drag exists while rotating the rear wheels.
5. Operate control lever 10 times or more with a full stroke (216 mm or 8.5 inches).
6. Adjust control lever by turning adjusting nut.
7. Pull control lever with specified amount of force. Check control lever stroke and ensure smooth operation. Lever stroke (number of notches): 7 – 8 Force: 196 N (44 ft. lbs.).
8. After adjustment, check that there is no drag while the control lever is
being released. If drag exists, perform the following:
• Remove the rear disc rotor. Verify the toggle lever returns to stopper when the parking brake lever is released.
• If toggle lever does not return to stopper, loosen adjusting nut.
• Install rear disc rotor and adjust shoe clearance.
Break-in of New Rear Rotor or Shoes
If the parking brake is not holding the vehicle after a rotor or shoes have been replaced, it might be necessary to break-in and bed the shoes and rotors. Do not carry out the break-in procedure aggressively. Doing so may cause uneven or premature wear of the brake shoe lining and glazing will make the problem even worse.
When new parking brake shoes or brake rotors are installed or when parking brake performance is poor, perform the following break-in procedure.
1. Drive the unloaded vehicle on a safe, level and dry road.
2. Pull the parking brake control lever with a force of 147 N ( 33 lbs) .
3. While pulling the lever, continue to drive the vehicle forward 100 meters (328 ft) or a little longer than a football field at approximately 22 mph.
4. Allow the parking brake to cool down for approximately five minutes.
5. Release the parking brake control lever and drive the vehicle under normal conditions for two minutes to cool down the parking brake.
6. Repeat steps 1 through 5 three times and repeat just step 5 once more.
7. After performing the break-in procedure, check the stroke of the parking brake control lever. If it is out of specification, adjust again.
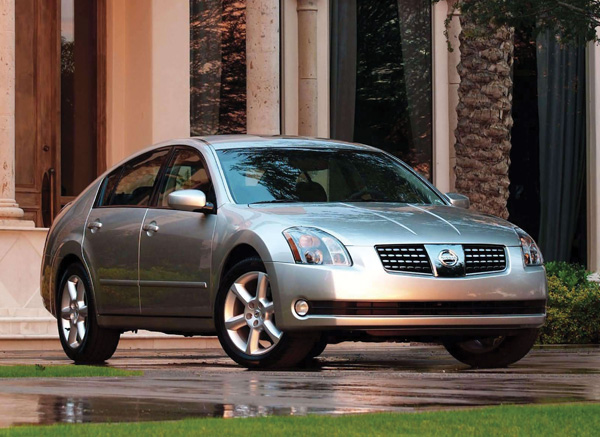
TSB: ABS Activates Under Normal Braking and/or ABS Lamp is On
Vehicles: 2004 – 2007 Maxima (2007 built before 1N4BA41 E(*)7C 806900 and built before July 10, 2006.
Condition: The ABS light is ON with one or more of the following DTC stored:
• C1105-RR RH Sensor 2
• C1110-Controller Failure
• C1124-RR LH IN ABS solenoid
• C1126-RR RH IN ABS solenoid and/or the ABS system activates with normal braking.
Diagnostic Procedure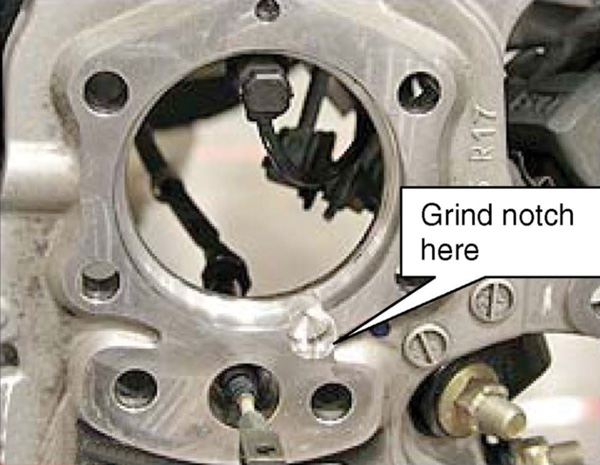
1. Remove only the right rear brake rotor, wheel hub assembly, baffle plate and ABS wheel sensor.
2. Clean the corrosion off of the knuckle, wheel hub assembly and baffle plate.
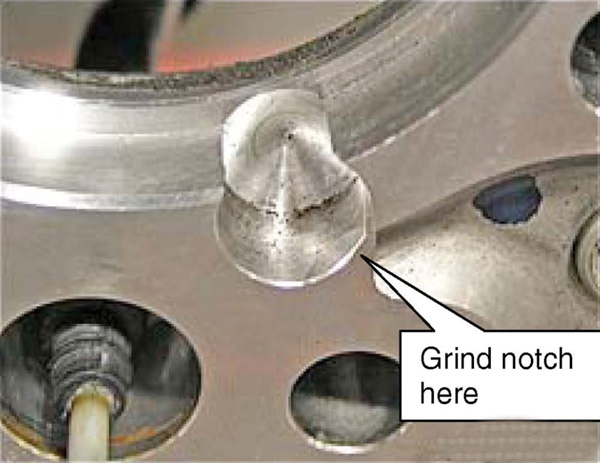
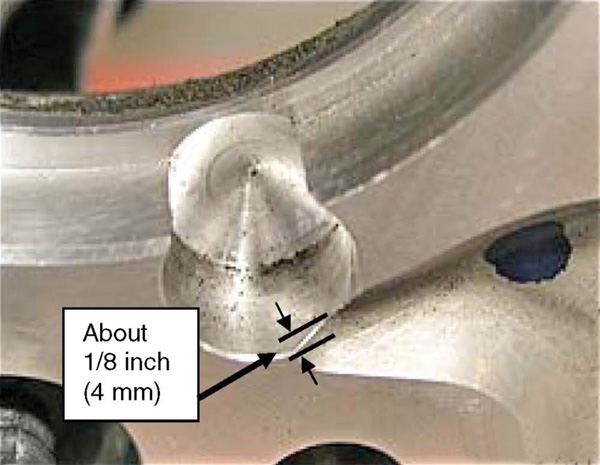 3. Grind a notch in the knuckle locating hole (locating hole for plastic hub cap).
4. Reassemble using the new plastic cap and a new ABS wheel sensor.
5. If code C1126 and/or C1124 is stored; replace the ABS actuator.
6. Test drive vehicle; recheck for code C1110 (refer to step 10 in the Service Procedure).
Service Procedures
1. Remove only the right rear (passenger side) brake rotor, wheel hub assembly, and baffle plate.
2. Remove the plastic hub cap.
3. Remove the right rear ABS wheel sensor as follows:
a. Apply corrosion penetrant to the sensor bolt.
b. Use a punch and hammer to lightly tap the sensor bolt.
c. Remove the sensor bolt and sensor.
4. Clean corrosion off of the knuckle, baffle plate and wheel hub assembly.
Use a non-metal brush on the wheel hub assembly. A metal brush may damage components. A wire wheel or metal brush can be used on the knuckle and baffle plate.
5. Grind or file a notch in the locating hole.
6. Install the new plastic hub cap.
7. Reassemble all parts removed in reverse order. Nissan recommends to use a new ABS wheel sensor.
8. If code C1124 and/or C1126 was stored; replace the ABS actuator.
9. If you did not replace the ABS actuator in step 8, do the following:
a. Use CONSULT-II to clear all ABS DTCs.
b. Test drive the vehicle.
c. Recheck for code C1110.
10. If code C1110 is stored, replace the ABS actuator.
11. Test drive the vehicle; make sure the incident is fixed and ABS light does not come on.
TSB: Front Brake Caliper Oil or Fluid Residue
Vehicles: 2005-2007 Maxima
Condition: There is oil residue on the brake caliper around the piston boot and nearby caliper.
Diagnostic Procedure
1. Determine if the residue is brake fluid or assembly lubricant. Assembly lubricant is applied to the brake caliper when it is built and some residue is normal.
![]()
2. DO NOT replace the caliper for assembly lubricant residue.
Service Procedures
1. Remove lower pin bolt from the brake caliper, then pivot brake caliper to the up position.
2. Remove the brake pads and hardware from the caliper bracket.
3. Clean the brake caliper with brake cleaner. Make sure the caliper is fully dry before going to step 4.
4. Reinstall the brake pads and hardware in the torque member and pivot the brake caliper into position.
5. Insert lower pin bolt to brake caliper. Torque to 22 – 31 N.m (2.3 – 3.1 kg-m, 17 – 22 in-lb).
6. Set the parking brake and place the gear selector in “P” or “N”.
7. Start vehicle and leave it on during the next few steps.
8. Depress brake pedal slightly (1/8 brake) for 10 seconds.
9. Depress brake pedal as long as pedal stroke for 60 seconds.
10. Repeat steps 8 and 9 three (3) times.
11. Depress brake pedal as long as pedal stroke for 60 seconds.
12. Repeat step 11 three (3) times.
13. Turn off the vehicle.
14. Visually check for oil residue on caliper. If caliper is wet, replace caliper using normal warranty procedures. If caliper is dry, do not replace.