Disc brakes are not “self-energizing” like drum brakes, so they require more pedal effort to apply. It’s the magic of power brakes that allows a 98-lb. little old lady to bring two tons of Lincoln Town Car to a screeching halt with little more than a light caress of her foot against the brake pedal.
Power brakes are great when they work correctly, but what happens when they don’t? Suddenly it takes a lot more effort to bring the vehicle to a halt. This may increase the distance it takes to stop the vehicle and create a potentially dangerous situation. So if a vehicle is suffering from increased pedal effort, the first thing you should check is the power brake system.
VACUUM BOOSTERS
Most power brake systems use a vacuum booster to assist braking. Vacuum is good for a lot of things, like sucking gas through a carburetor, opening and closing airflow doors in a vehicle’s climate control system, and for providing extra muscle for braking. But to assist braking, it takes a lot of vacuum.
 How can something take a lot of nothing? After all, vacuum is the absence of atmospheric pressure. The answer is the higher the vacuum, the greater the atmospheric push to fill the void. As some famous scientist once said, “Nature abhors a vacuum.” What he meant was as soon as you create a hole in the air (vacuum), the surrounding air tries to rush right in to fill it back up. So the push that a vacuum brake booster gives to the master cylinder is actually atmospheric air pressure.
At sea level, air pressure is 14.7 lbs. per square inch, which equals about 30 inches of vacuum on a gauge. The average engine can’t pull that much vacuum, so the most intake vacuum you’re going to read is about 20 to 22 inches. Most engines pull a steady 16 to 20 inches of vacuum at idle. One exception is a diesel, which has no throttle to create a restriction and thus no intake vacuum. So diesels have to use an auxiliary vacuum pump if they have a vacuum brake booster.
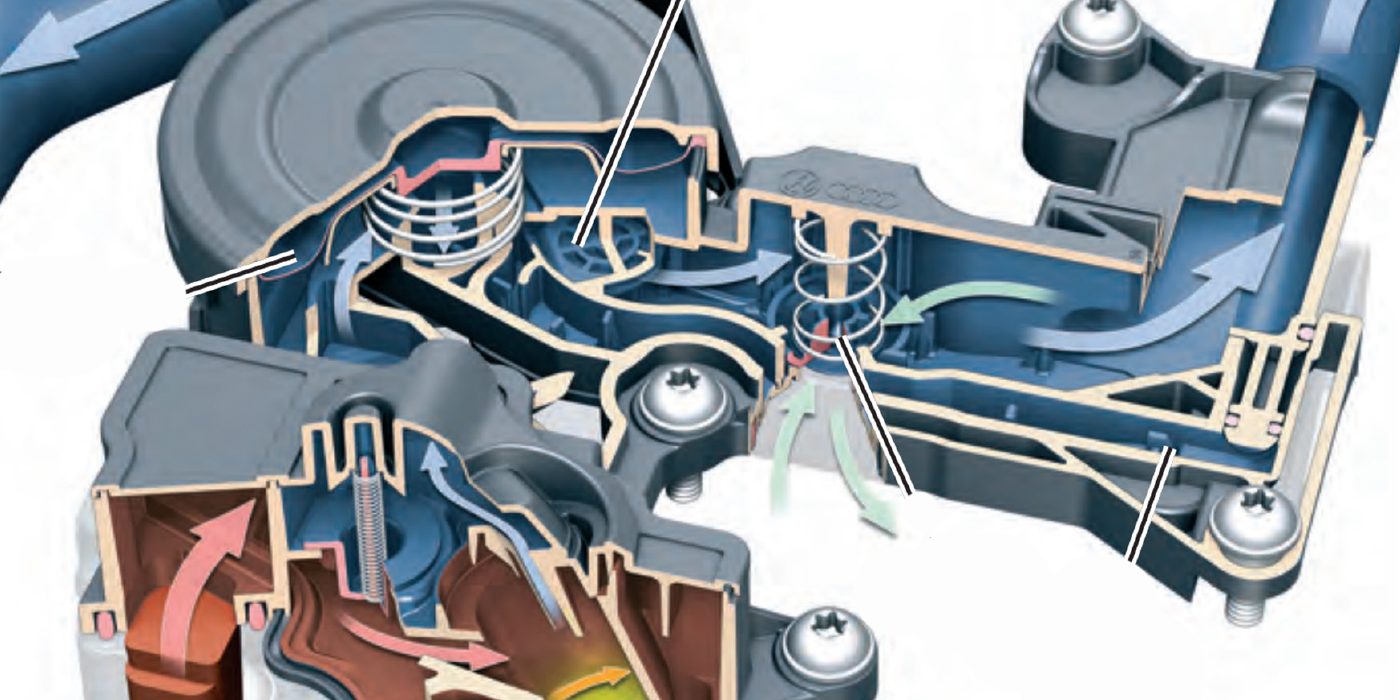
How the brake booster uses vacuum to provide power assist is amazingly simple. The original “Master-Vac” power brake booster that became the predecessor to virtually all vacuum boosters today was patented back in the 1950s by Bendix. The booster housing is divided into two chambers by a flexible diaphragm. A vacuum hose from the intake manifold on the engine pulls air from both sides of the diaphragm when the engine is running. When the driver steps on the brake pedal, the input rod assembly in the booster moves forward. This blocks off the vacuum port to the backside of the diaphragm and opens an atmospheric port that allows air to enter the back chamber. Suddenly, the diaphragm has vacuum pulling against one side and air pressure pushing on the other. The result is a forward push that helps shove the push rod into the master cylinder for power assist.
The amount of power assist that’s actually provided by the booster depends on two things: the size of the diaphragm and the amount of intake manifold vacuum produced by the engine. The larger the diaphragm, the greater the boost. An 8-inch booster with 20 inches of engine vacuum will provide about 240 lbs. of brake assist.
From this, it should be obvious that the vacuum booster needs two things to do its job: a good vacuum supply from the engine and a good diaphragm. A vacuum supply hose that’s loose, leaky, collapsed or restricted may not allow the booster to receive enough vacuum to provide the usual amount of power assist. Consequently, the driver will have to push on the brake pedal harder to get the same braking as before.
A restricted vacuum hose will cause boost to drop off when the brakes are applied in rapid succession. This happens because the blockage slows the return of vacuum in the booster.
To check engine vacuum, connect a vacuum gauge to the supply hose that runs from the intake manifold to the booster. A low reading (below 16 inches) may indicate a hose leak or obstruction, a blockage in the exhaust system (plugged catalytic converter, crushed pipe, bad muffler, etc.), or a problem in the engine itself (manifold vacuum leak, bad valve, head gasket, etc.).
The condition of the diaphragm inside the booster is also important. If cracked, ruptured or leaking, it won’t hold vacuum and can’t provide much power assist. Leaks in the master cylinder can allow brake fluid to be siphoned into the booster, accelerating the demise of the diaphragm. So if there’s brake fluid inside the vacuum hose, it’s a good indication the master cylinder is leaking and needs to be rebuilt or replaced. Wetness around the back of the master cylinder would be another clue to this kind of problem.
To check the vacuum booster, pump the brake pedal with the engine off until you’ve bled off all the vacuum from the unit. Then hold the pedal down and start the engine. You should feel the pedal depress slightly as engine vacuum enters the booster and pulls on the diaphragm. No change? Then check the vacuum hose connection and engine vacuum. If OK, the problem is in the booster and the booster needs to be replaced.
Vacuum boosters also have an external one-way check valve at the hose inlet that closes when the engine is either shut off or stalls. This traps vacuum inside the booster so it can still provide one or two power assisted stops until the engine is restarted. The valve also helps maintain vacuum when intake vacuum is low (when the engine is under load or is running at wide open throttle). You can check the valve by removing it and trying to blow through it from both sides. It should pass air from the rear, but not from the front.
HYDRO-BOOST
Though not as common as vacuum booster power brake systems, the Bendix “Hydro-Boost” system dates back to 1973. The system uses hydraulic pressure generated by the power steering pump rather than engine vacuum to provide power assist.
Inside the Hydro-Boost unit, which fits between the master cylinder and brake pedal the same as a vacuum booster, is a spool valve and piston assembly. When the driver steps on the brake pedal, the pushrod slides forward and changes the position of the spool valve. This opens a valve port that routes power steering fluid into the cavity behind the piston to push it forward and apply the brakes.
 Another component in the system is a pressure “accumulator.” Some are nitrogen pressurized while others are spring loaded depending on the application. The accumulator’s job is to store pressure as an emergency backup in case pressure is lost (engine stalls or power steering pump drive belt breaks). There’s usually enough reserve pressure in the accumulator for one to three power assisted stops.
Problems with this system can be caused by spool valve or piston wear inside the Hydro-Boost unit, fluid leaks or loss of pressure (worn pump, slipping pump belt, etc.). A simple way to test the Hydro-Boost system is to pump the brakes five or six times with the engine off to discharge the accumulator. Then press down hard on the pedal (about 40 lbs. of force) and start the engine. Like a vacuum booster, you should feel the pedal fall slightly when the engine starts, then rise.
The leakdown of the accumulator can be checked by pumping the brakes several times while the engine is running, then shutting it off. Let the car sit for about an hour, then try the brakes without starting the engine. You should get two or three soft brake applications before it takes more effort to push the pedal.
Grabby brakes are probably the result of contamination in the system or a broken spool return spring. If the brakes tend to grab by themselves, you’ve probably got as case of restricted return flow or a defunct dump valve. Excessive pedal effort can usually be attributed to internal leakage or the seeping of fluid past the accumulator/booster seal.
If a problem turns out to be in the booster itself, you’ll have to replace it. Be sure to depressurize the accumulator by pumping the brake pedal half a dozen times before you open up any plumbing connections, otherwise you might get blasted by high pressure brake fluid.
ELECTROHYDRAULIC
On vehicles with integral anti-lock brake systems where the master cylinder is part of the hydraulic control assembly (Teves Mark 2 ABS, Bosch III ABS, Delco Powermaster 3 ABS, Bendix 10 and Jeep ABS), an electric pump with a nitrogen pressurized accumulator is used to provide power assist.
 With these systems, power assist is provided by pressure stored in the accumulator. We’re talking a lot of pressure here, from 675 up to 2,600 psi depending on the system and application. When the driver steps on the brake pedal and the pushrod moves forward, it opens a valve inside the master cylinder that allows stored pressure from the accumulator to enter a cavity behind the piston assembly. This pushes the piston forward and applies the brakes.
A pressure switch on the master cylinder monitors the stored pressure in the accumulator, and closes a switch to turn on the electric pump when pressure drops below a preset minimum. It then turns the pump off when pressure is back up to where it should be.
Problems with this type of power brake system will usually be due to a bad pump motor, a leaky accumulator, or internal problems in the master cylinder assembly. Because it’s all part of the ABS system, electrical problems with the pump motor or pressure switch as well as low fluid level or low pressure will usually trigger a fault code and activate the ABS warning light. To find out what’s wrong, you’ll have to hook up a scan tool or use the appropriate diagnostic procedure to pull out the trouble codes. Accurate diagnosis here requires referral to the applicable shop manual.
The electric pump and accumulator can usually be replaced separately if there’s a problem, but the master cylinder and hydraulic control unit are replaced as an assembly (which is very expensive!).
The most important thing to keep in mind about servicing these systems is to always depressurize the accumulator before working on any part of the brake system or opening up any plumbing. The pedal needs to be pumped 30 to 40 times with the engine off (or until an increase in pedal effort is clearly felt) to bleed off all the pressure from the accumulator.