The Grease Kit for the Avalon, Camry and Solara is listed under P/N 04007-76133 (2 Cylinders [4g] needed); the kit for the Highlander and Highlander HV is P/N 04007-76248 (5 Cylinders [10g]).
To resolve the condition, lubricate the intermediate shaft as described in this Tech Tip.
Note: Review safety procedures in ALLDATA Repair before beginning.
Applicable Models
2006 Highlander HV
2004 – 2005 Highlander
2004 – 2006 Solara
2005 – 2006 Avalon
2003 – 2006 Camry
Steering Intermediate Shaft Removal
Note: Prior to removing the steering intermediate shaft, install a steering wheel holder to ensure that the steering wheel and front wheels remain stationary. Once the intermediate shaft is removed, do not allow the steering wheel to spin freely.
1. Disconnect the steering intermediate shaft sub-assembly.
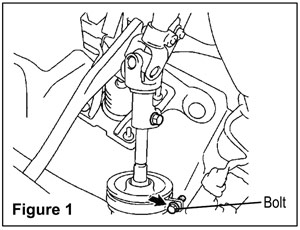
a. Loosen the bolt and remove the clamp from the steering column boot (Figure 1).
b. Separate the steering column hole cover from the boot.
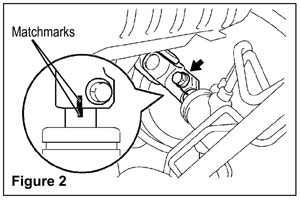
c. Place matchmarks on the steering intermediate shaft sub-assembly and steering gear assembly (Figure 2).
d. Remove the bolt and disconnect the steering intermediate shaft sub-assembly.
2. Remove the steering intermediate shaft sub-assembly.
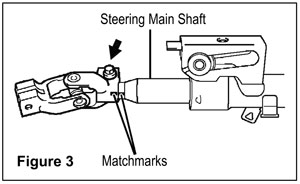
a. Place matchmarks on the steering sliding yoke sub-assembly and steering main shaft assembly (Figure 3).
b. Remove the bolt and steering sliding yoke sub-assembly from the steering main shaft assembly.
3. Slightly lift the spline shaft upward and expose the splines. Two teeth have been machined down to allow a needle to be inserted to apply the lubricant. Once the missing spline has been located mark it. The other machined spline is located 180 degrees from the original.
4. Insert the needle into the shaft and then install the tube of lubricant to the needle (Figure 4).

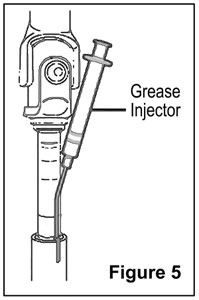
5. After attaching lubricant to the needle squeeze the tube to apply the grease to the splined portion. All of the grease in the tube should be applied (Figure 5).
6. After applying the grease on one side remove the needle from the shaft. Place the needle into the shaft on the opposite side (180 degrees from the original location) and add lubricant as performed in step 5.
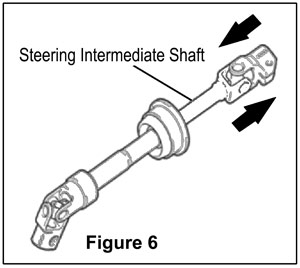
7. Hold the intermediate shaft from the upper and lower portions and compress and extend about 20 times to ensure that the lubricant is thoroughly distributed inside the splined portion of the intermediate shaft (Figure 6).
Note: Make sure that during this process, no foreign objects or material contaminate the grease.
Steering Intermediate Shaft Installation
1. Install the steering intermediate shaft sub-assembly.
a. Align the matchmarks on the steering sliding yoke sub-assembly and the steering main shaft (Figure 7).
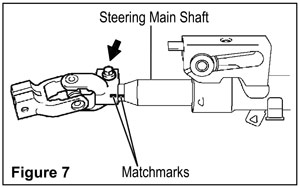
b. Install the steering sliding yoke sub-assembly with the bolt.
Torque: 35.3 Nm (360 kg cm, 26 ft.-lbf.)
2. Connect the steering intermediate shaft sub-assembly.
a. Align the matchmarks on the steering intermediate shaft sub-assembly and the steering gear assembly (Figure 8).
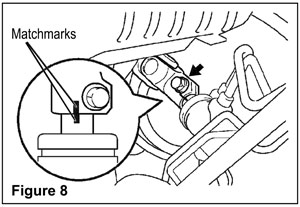
b. Install the steering intermediate shaft sub-assembly with the bolt.
Torque: 35.3 Nm (360 kg cm, 26 ft.-lbf.)
c. Install the steering column hole cover to the boot.
d. Connect the clamp to the steering column hole cover boot and tighten the bolt.
3. Road-test the vehicle to ensure that the noise is gone and that the steering is centered.
Courtesy of Chris Burton and Jeff Webster, ALLDATA technical writers.
Note: This Repair/Service Procedure is excerpted from a Technical Service Bulletin published by the vehicle manufacturer, and is intended for use by trained, professional technicians with the knowledge, tools and equipment to do the job properly and safely. It is recommended that this procedure not be performed by “do-it-yourselfers.”