Volkswagens have always been maintenance friendly. From the very first models, ease of repair and durability have been built into the design. VW has managed to keep basic maintenance procedures relatively uncomplicated throughout the years. In this article, I’ll cover some of the more common underhood procedures on common VW models and include some tips to make those services easier and more complete.
As I’ve indicated in prior articles covering VW, it’s important to start by verifying the model, engine code, country of manufacture and emissions system on the vehicle you’re servicing, so the correct parts are available when you need them. There are a number of running changes in many years, and additional model and engine changes, that don’t necessarily follow model year designations. One obvious conflict is that there are two very different 2.8L V6 engines that also come in several different configurations, one being the VR6 mounted in the transverse chassis, while the other is a conventional V6 mounted inline.
BELTS AND HOSE
Some of the earlier cars in the last 10 years still had two drive belts, while the later models have gone to one serpentine belt drive. On the earlier models, after removing the power steering drive belt by loosening the 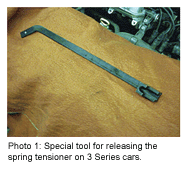 adjuster, the serpentine belt can be removed by releasing tension on the idler pulley. This can be done carefully with a properly sized wrench on the pulley arm, or you can use specially designed tool #3299 (see Photo 1) to release the tension. This tool makes releasing the tension both easier and safer. On VR6 models, a release bolt can be screwed into the tensioner body to release tension. For later, four-cylinder cars, the tensioner can be rotated with a 15mm open-end wrench and locked in the released position with a pin. There is no “standard” belt routing for these cars, so you may need to access the routing diagram for the particular model and accessory load. If you don’t have that information, making a quick diagram before removal is a good idea.
VW has transitioned from traditional spring-type hose connections to a quick-disconnect mounting for many major hoses. By removing the metal or plastic retaining clips, the plastic housings can be separated. The housings get brittle with heat and age, so use care when disassembling. These connections are sealed with an internal O-ring, so inspect and replace them if they are flat or torn. I used silicone, paste-type grease for assembly. The OE spring-type clamps work pretty well, but they can be a challenge to remove and reinstall. One of the remote cable release pliers works well in some cases. VW OE hoses have alignment markings for the hoses to help prevent kinks.
COOLING SYSTEM
With all of the recent confusion over the different coolants on the market, I won’t get into that topic in this article. VW has had some cooling system issues over the years, but at least the water pump was mounted externally so leaks were obvious. The later cars now have the pump mounted to the block and driven by the timing belt. The timing belt covers are good at hiding small leaks from the pump until overheating starts. Look for signs of coolant residue along the oil pan flange under the front crank pulley. I previously noted cases of water pump impeller failure on BMW models. Well, now we can say that VW has the same problem with plastic impellers failing.
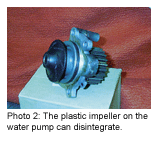 Diagnosis of this particular problem is still in the category of an educated guess, but we are getting better at it. Usually there will be enough flow to allow the engine to cool at idle, but any amount of revving will cause the temperature to climb as the coolant flow stops. Also, the heater will be putting out heat until engine speed increases. Photo 2 shows an extreme example of the impeller failure. The VW impeller parts are small enough to disappear into the system, which may cause additional problems down the road.
 I recommend at least pulling the water pump with a timing belt change to inspect the impeller and recommend replacement if there any signs of leakage or erosion. If the shaft is noticeably difficult to turn, replace it. When ordering a replacement, specify a metal impeller, although they are not always readily available. VR6 engines use the same basic design, but the pump is turned by the serpentine belt and is external. When installing the pump, lubricate the O-ring with grease and make sure the block surface is clean and smooth so the O-ring doesn’t tear.
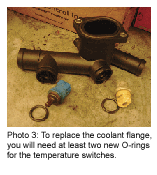
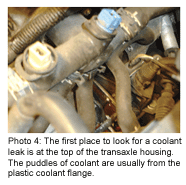
On the other end of the cylinder head (driver’s side on transverse engines) is a supply flange for the heater core (see Photo 3), or in the case of the VR6, the housing for the thermostat. I’ve covered this in previous articles, and it remains the most common coolant leak area for all VW models. Usually a puddle of coolant on the top of the transaxle housing (see Photo 4) is the first indication, after a loss of coolant.
 There will also usually be a trail of coolant residue easily visible from under the car near the right side transaxle output flange. A closer look will usually pinpoint the flange as the source. Replacement is straightforward, but tight in the VR6 and New Beetle models. You may need to remove some other components to gain enough space to get the clamps off and not break anything in the process.
Clean the cylinder head surface and inspect it for pitting. I use 100-grit abrasive cloth to resurface the aluminum head, and then use silicone grease on the O-ring so it doesn’t dislodge during installation, making sure it’s seated correctly in the flange. Tighten the bolts in stages so the flange doesn’t get cocked and crack while being installed. Carefully reinstall the hoses and temperature switches using new O-rings with grease.
TUNEUPS
With each year model, a tune-up is getting easier and easier. Still, it is one of the most overlooked and underdone maintenance items. The condition of the tune-up parts should be the first place to start a driveability diagnosis. A quick check of DTCs with a scanner can indicate when the tune-up may be the problem, with misfire codes being the most common.
VW, along with other manufacturers, has extended some maintenance intervals in the past few years, but spark plug replacements at 20,000- and 40,000-mile intervals are still recommended on most VW models. Be sure to use the specified plugs (brand and type do matter!) to prevent causing additional problems.
Spark plug replacement can be a challenge on many newer cars, and VW is no exception. Using a special tool to remove the spark plug connectors will prevent torn boots, which can lead to arcing that affects vehicle operation.
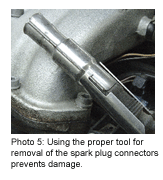 In photo 5, you can see how the puller engages the tabs on the metal plug cover to both remove and install the connector without damage. Earlier cars were delivered with a plastic version of this boot puller attached to the hood support rod from the factory, but most are missing by now. One other tip here: On four-cylinder engines, disconnecting the #2 and #3 fuel injector connectors will provide additional space for removing the plug connectors. Just don’t forget to reinstall the connectors after the plug replacement.
While all VW models have gone to D.I.S. or coil-on plug ignition, there are still millions of VWs out there with 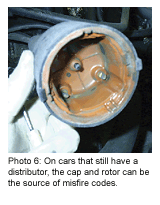 distributor caps and rotors. Photo 6 shows the effect of carbon tracking in a cap. The actual firing point of the spark is very obviously not lined up with the corresponding plug terminal. Replacement with every second plug change is probably OK if a quality replacement is used.
Watch out for look-a-like rotors that don’t have the proper resistor built in, which can be another source of misfire. Melted resistor insulation usually will always be present when the plug gap is excessive. The rotor can also become rusted to the shaft. A twist with a pair of pliers will remove it quickly. A little dab of grease will make the new one slide on easily without breaking it.
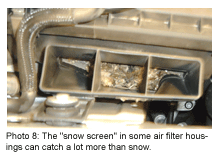
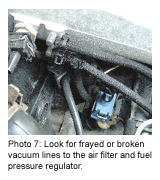 Air filter replacements are pretty straightforward. Some items to be careful with are the connecting hoses (post MAF), and the secondary air and the vacuum hose connections (see Photo 7). The rest of the replacement is just finding the space to remove the lid and slide in the new element. On V6 and turbo models, look at the intake section of the filter housing for a “snow screen” that was installed to prevent large items (like rodents) from entering the filter housing. Over time, this screen can collect enough small debris (see Photo 8) to cause serious air restriction to the filter. The screen is easily removed and cleaned. And while you have the filter housing open, you can also use a shop-vac to remove the obstruction.
 BRAKE FLUID FLUSHING
Very often, the second most-neglected maintenance item is the brake fluid. Most of the time, the customer sees the light come on and just tops up the fluid, without any thought that the fluid might have gone bad. One look at the color of the fluid inside the reservoir should be enough of a clue as to its condition. Although, with the somewhat opaque plastic bottle used by VW, the fluid condition is not easily determined visually. Use an electronic moisture meter, or test strips to determine the need for fluid change. I’ve found that fluid that is obviously cloudy may still pass a meter or test strip test.
Recommend changing the fluid regardless of its condition at two years. Here in the Northwest, people do a lot of mountain driving. Brake fluid boiling and brake fade are common, so we treat this as an important safety issue. The procedure I use to replace the fluid takes into account the difficulty of attaching a remote fill bottle to most of the VW line. The New Beetle, in particular, has the reservoir in a difficult location.
The first step is to clean the cap and exterior of the reservoir to prevent contamination of the reservoir.
Remove any obstructions to the reservoir. In the case of the New Beetle, you’ll find it easiest to remove the air filter lid after disconnecting the MAF sensor wiring.
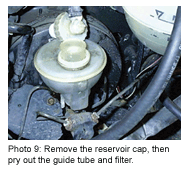
Remove the reservoir cap and pull out the guide tube (see Photo 9) for the float, which is also the filter. To do this, I use two small picks on either side of the tube and pry it up until it can be removed with pliers.
Use a vacuum bleeder to draw out the old, dirty fluid from the reservoir. If necessary, use a small piece of tubing (I use the wand from a spray can) to draw the fluid from the small baffled areas in the separate chambers. Also spend some time vacuuming out the goop that collects in the bottom of the reservoir.
Refill the reservoir with fresh fluid.
The rest of the procedure is basic pressure or vacuum bleeding of the system. The normal longest-to-shortest brake line works fine with normal or ABS systems. Just remember to bleed the system until clean fluid comes out of the line at the wheel, and make sure there is adequate fluid in the reservoir at all times.
 CABIN AIR FILTERS
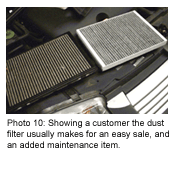
Who would have thought that the air coming into the passenger compartment was so dirty! We’ve seen cabin, environmental or pollen filters so badly plugged that it’s a wonder any air was coming in at all. These filters are a pretty easy sell to customers. One look at the stuff collected on the element (see Photo 10) makes it easy to recommend replacement at regular intervals. On all but the New Beetle, VW has made the replacement of these filters (installed since 1995 on some models) pretty easy.
On all but the New Beetle, start by removing the plenum cover in the right (passenger) rear corner of the engine compartment. This cover is retained by the rear engine compartment seal, and screws to lock or twist locks. You will need to carefully twist the cover out to clear the firewall without breaking the cover.
Release the retaining frame by removing the tension locks at each end, or by pressing the outer frame to release the locking tabs from the front of the housing. Note how the element is positioned into the frame. Swap in the new element and reinstall it in reverse order.
Carefully reinstall the outer cover, making sure the channels that direct water from the plenum area are in their proper position.
On New Beetle models:
You must remove three portions of the dash panel to access the filter from inside the car. Clean your hands really well or use fresh gloves, as the dash panels are easy to smudge and hard to clean.
Slide the center panel of the dash forward about 1 inch to release the pins at the rear edge, and then lift it off. Note the way the panel clips into the other panels so reassembly will make more sense.
Remove the screws and spring washers that hold the right side panel in place, then pull up sharply to release the panel at the inner end. Pull the panel toward the left side of the car to release the pins that extend into the right “A” pillar.
The inner access panel over the filter plenum can now be removed by taking out the screws around the perimeter and prying it up slightly to release the seal.
The filter element is released from its frame by prying lightly on the outer housing to release the retaining tabs. The element and frame need to be twisted slightly to come out of their hole. Make sure any leaves or twigs don’t fall into the fan housing from the plenum area.
Reassemble the dash in reverse order, making sure to line up the alignment pins before snapping the panels into place, or you’ll have a dash that doesn’t fit right and will rattle.
FINISHING UP
This article could go on and on. Having serviced these cars for so many years, it’s hard to convey in an article all of the little quirks and tips in a small space. If you have, or will, spend much time servicing these cars, the obvious places to look for problems will be repetitive and save a lot of time in diagnosing and repairing.
If care is used in selecting repair parts, and proper procedures are used for repairs, these vehicles are simple to repair. VW owners have traditionally been pretty loyal to their cars. Many of them will be lifelong customers if you take the time to understand them and their cars.