The Precursor of Head Gasket Replacement

When speaking with my clients, I often find myself warning them of the importance of keeping a sufficient amount of clean oil in the engine and to keep an eye on the temp gauge. Those of us who have been around for a while remember the times when we would see our customers at the gas pump every couple of days, giving us the chance to get under the hood and check the fluid levels. I think some of the younger folks think I’m making it up when I tell them that an attendant would wash the windows and check under the hood, in addition to pumping gas. Now, that responsibility falls on the shoulders of the driver in between service intervals that happen every 3,000 miles, at best.
An argument can be made that vehicle systems have improved over the years, with warning systems that monitor the essential fluids, and vehicle quality, in general, has improved to the point where various checks aren’t necessary, and, if they are, at lengthened intervals. At the same time, we can make the case that the increased quality allows these vehicles to stay on the road for hundreds of thousands of miles, and as those miles add up, so does the need for periodically “checking under the hood.”
 So it’s still important to remind our customers to check their vehicle’s fluid levels every other gas fill up. We’re happy to teach them what to look for, and if they aren’t comfortable doing it themselves, we encourage them to stop by the shop and we’ll be glad to take care of it at no charge.
This lack of periodic oversight makes the routine services our shops perform critically important. If you’re lucky, you may see the car every 3,000 miles, but as carmakers extend oil change intervals, the car may not have had the hood raised for twice that long. That’s why it’s so important that the techs who are handling what we call routine services are checking all the vital fluids, and have the training that lets them look at the car with an eye toward current and future problems.
When it comes to cooling system problems you may see on the Hyundai line, there are a few that would be considered serial failures. But, as these cars accumulate miles, you’ll see the same type of service opportunities you would find on any other vehicle.

BASICS FIRST
It never hurts to go over the basics and that’s where we’ll start. Most often, a Hyundai with a cooling system issue will find its way to your shop for a few reasons. One is the temperature gauge is reading higher than normal. Of course, that assumes the customer is aware they have a gauge. Another is a leak under the car that has gotten their attention, or maybe the check engine lamp is on and you find a code for excessive engine temp. Or, the car is on the back of a tow truck as a result of overheating on the road.
Regardless of how the car got to your shop, the diagnostic process begins the same way. First, be sure there is sufficient coolant in the radiator and pressure-test the system. Generally, we’ll start with a cold system, and then bring up the pressure and let the car sit for more than a few minutes. If you find the cooling system is low during a service, be sure to give the pressure test enough time to let the coolant find its way to the floor.
On the four-cylinder cars, it’s not too much of challenge to locate where the coolant is finding its way out. The V6s can be a bit more challenging, but it certainly pays to be patient. Speaking of finding the system low during a routine service, be sure the oil change tech is checking the level in the radiator and not just the unpressurized reservoir tank. If the system is compromised by a leak, there’s a good chance it won’t pull the coolant from the tank, and you sure don’t want to send the car out with low coolant.
When it comes to looking for leaks, it may take a bit of detective work. If you see a drip on the floor, it’s pretty straightforward where to find the leak. However, if there is no evidence of a leak, look for the telltale trails at the radiator seams as well as all the hose connections. Don’t overlook the water pump, which may be under the timing belt cover. While not a common problem, there have been some reports of freeze plugs leaking behind the flywheel. If the stain is there, you can be sure it’s leaking now or has leaked in the past, but, in either case, it should be resolved.
If the vehicle came in for a running-warm condition or is on the back of the tow truck, the strategy is similar, even though you’re not yet completely sure of the problem. Chances are the coolant will be low, but was that the cause or the result of the overheating?

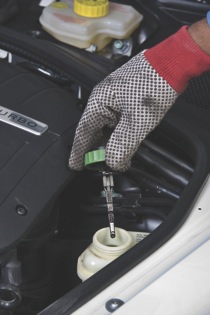
Your next step is to carefully go through the warm-up process. We use a funnel that attaches to the radiator. This inexpensive tool aids in the bleeding process as well as lets us monitor what the coolant is doing. If the thermostat is stuck closed, it won’t take long for the coolant to start bubbling violently in the funnel. Although some bubbles are normal as the thermostat opens, the reaction of the coolant when the thermostat is stuck closed is hard to miss.
Let the car run until you have good heat in the car and the radiator cooling fan runs, indicating the system is bled. As the system is being bled and the thermostat reaches opening temp, some bubbles in the coolant will be evident in the funnel, but they will dissipate and be random in nature. If you’re seeing a steady stream of bubbles, it’s a good indication of a head gasket problem and will require some further diagnosis that we will get into in a few minutes.
The next steps depend on the answers that the driver was able to provide when the problem occurred. You need to find out if the problem occurred when they were in traffic or at highway speeds and was the temp gauge reading normal? This answer will tell you if the customer is even aware there is a gauge. In the cold weather, many times the first thing he or she will notice is the heat in the car is coming and going, a sure indication of low coolant. So, now you take the information provided by the customer and add it to what you learned during the warm-up bleed procedure and plan the next step.
Assuming you didn’t have that steady stream of bubbles, your next step would be a pressure test. It has to be done before the car is returned to the customer, and there is no doubt that any leak in the system will lead to overheating, so you may as well eliminate the question mark. If the customer reported that they were in traffic when they had the problem and you confirmed cooling fan operation during the warm-up procedure, it only makes sense to assume the coolant was low.
If the customer reported the problem was evident at highway speeds, a post-pressure road test is the next step. If the vehicle is running hot on the highway, but goes back to normal around town, suspect a plugged radiator. Be sure you’re testing with similar ambient temperatures if you want to try to duplicate this condition.
CONFIRMING THE LEAK
Let’s look at how we would proceed if we had that steady stream of bubbles during the warm-up procedure. There are a couple of ways to confirm head gasket leakage that would have led you to the overheating problem as the coolant got low. You can take the wand from your four-gas machine and carefully sample the air above the coolant looking for hydrocarbons. But any mishaps that result in coolant being drawn into the machine will be costly. There is a dye kit that works well on the same principle as the four-gas machine, as it samples the air that escapes the radiator looking for hydrocarbons, indicated by a change of color in the sample fluid. This is the test we use on Hyundais where spark plug access prevents us from using the more reliable cylinder leak-down method of testing.
A leak-down test will not only confirm your head gasket diagnosis, but it will also pinpoint the offending cylinder. Extra care can be taken when the head is off to be sure there are no issues in that cylinder that would prevent a successful repair. A leak-down test isn’t difficult; it will require a leak-down tester — a simple tool that allows you to fill the cylinder with compressed air (most have two gauges). One gauge indicates the air being introduced into the cylinder, while the other indicates how much the cylinder can hold.
As you would expect, the first step is to get the piston on TDC with both valves closed. With the spark plugs removed, turn the crankshaft clockwise until the TDC mark is at zero. On a four-cylinder car, this would indicate that either cylinder one or four are ready to be tested. Install the tester in one or the other and slowly open the valve, allowing the air to enter the cylinder.
Caution: As the air enters the cylinder, there is a chance that the crankshaft will rotate if the piston is not right at TDC. Be sure the wrench used to turn the crank has been removed and your hands are clear. If you’re in number one cylinder and it shows lots of leakage, move the gauge to cylinder number four and try again.
Leak down is represented as a percentage. If you use 100 psi as an inlet pressure, the second gauge will read percentage directly. A good cylinder will leak 10% or less, but it’s not surprising to see a high-mileage, well-maintained modern engine leak 2% or less. But what you’re looking for is evidence that the cylinder is leaking air into the cooling system. Do this by looking in the fill funnel for those telltale bubbles of air or the coolant otherwise reacting to the pressure.
Like the pressure test, be patient and give the air some time to work its way out. If number four looked good, follow the firing order and check the other cylinders. Be sure to close the valve and disconnect the tester. Turn the crank to bring number two up to TDC. You won’t have the benefit of the timing mark to be sure you’re on top dead, so you’ll have to rely on your sense of feel with a suitable tool through the plug hole to get there.
It isn’t difficult; when the piston reaches TDC there won’t be any movement for a couple of degrees. The trick is splitting those few degrees. Using this method, you are more apt to have the crank move when the air valve is open, so always use good safety practices.
If your testing confirmed a head gasket problem, you have some decisions to make before you prepare an estimate and contact the customer. You’ll remember at the beginning of this article, I mentioned that the Hyundai line has few serial problems with the cooling system including the head gaskets, so I would be concerned about why the gasket failed. Chances are it was the result of overheating over a period of time, or one time where the overheating was overlooked. The last thing you want to do is replace the gaskets without addressing the root cause of the failure; and don’t forget to be sure the head is flat.
RELATED REPAIRS
While the gasket is being be replaced, it’s the perfect time to replace the timing belt along with the water pump if it was not recently replaced. The inexpensive thermostat should also be replaced if it was subject to extreme temps. In an ideal world, you would replace the radiator as well, and, at the least, talk to your customer and explain that this failure was the result of overheating, and the importance of making sure the cooling system is doing its job by keeping an eye on the gauge.
Since we’re talking about the gauge, one of the problems we didn’t talk about is the gauge reading high when the coolant wasn’t hotter than normal.
If you get one that seems to be misreporting the temperature, a simple check with an infrared thermometer near the gauge sensor, or comparing the temp reported to the scanner from the engine management ETC sensor versus the dash reading, will confirm the issue. The best way to fix this issue is to find all the grounds and be sure they are clean and secure.
You could add a redundant ground from the battery or other known-good ground to the engine as close as possible to the gauge. But, I suspect the car will run better if you take the time to find and clean all the grounds.
With the amount of Hyundai models and engines that are in service, we won’t go over the nuts and bolts of the head gasket job, and I will say that any experienced tech will have no problem handling the job. The Hyundai Tech Info site, www.hyundaitechinfo.com, will walk you through the head gasket job on any of the Hyundai models, or any other repair for that matter.
This article won’t make you a Hyundai cooling system expert, but I hope you got something out of going over the basics. More importantly, I hope I indicated there is no reason not to welcome Hyundais into your bays. This company continues to build good, affordable vehicles that deliver good value to their customers. It has a strong dealer and parts network and realizes the importance of independent repair shops having the proper repair information needed to service their vehicles. Sounds like a pretty good partner to me. Register today!