Courtesy of TechShop by Eric Garbe
One of the biggest mistakes I’ve seen over the years starts with an auto technician being unhappy with the performance of his or her air impact wrench. To make matters worse, there’s always a certain aura surrounding this tool, and whomever owns the most powerful one in the shop holds sort of “bragging” rights over everyone else.
Not only are technicians searching for the type of power that can break loose almost any bolt, but whether we admit it or not, there’s a competitive spirit in most of us that wants to have the most powerful impact in the shop.
Then one of the local tool dealers strolls in with a brand-new impact wrench featuring all-kinds of earth-shattering torque and before you know it technicians are willing to make payments for the next six months with the hopes that their new tool will dethrone the top dog and break bolts loose without breaking a sweat. The unfortunate reality is that in most cases their new tool doesn’t live up to expectations. Even if it happens to work better than their old one, it’s probably still not at full capacity, a fact often unbeknownst to the owner.
All air tools are designed to work with a specific amount of air pressure, and most of those we use for automotive repair are in the range of 90-100 pounds per square inch (psi). Just like an internal combustion engine produces maximum power and torque at a certain RPM range, your air tools are designed to operate at a specified psi and airflow in order to provide their designed speed and torque.
This is where the wheels usually start to fall off the wagon. We’re often warned by tool dealers not to operate air tools at a pressure higher than they’re rated because it will cause accelerated wear, and perhaps sudden failure of the tool. Do we listen? Usually not. If the tool works and gets an extra boost from the higher psi in the shop, it’s all good, right? We’ve got work to do and no time to piddle around with the small details!
We also know that the lower the pressure, the lower the power output of an air tool. We’ve all waited plenty of times for the air compressor to kick off at its upper pressure limit before we try to break loose that crank bolt. And we know what the pressure gauge on the shop compressor reads, with most of them being between 120-150 psi, so we figure we’ve got plenty of pressure. But alas, we’re disappointed when the crank bolt still doesn’t budge.
The reality is that most likely your air tools are not getting the correct pressure and volume, and regardless of the pressure at the compressor, rarely are they subjected to higher-than-needed pressure. The key lies in static versus dynamic air pressure.
Static pressure is the amount available in the line when nothing is operating. When you read the gauge on the compressor, it’s easy to think this is what your air tools are operating at, and if you were to check the pressure at the end of your air hose, you would see the same reading. But this is only the static pressure.
Dynamic pressure, on the other hand, is the pressure available at your air hose when an air tool is connected and running. Air tools require a large volume of air to operate as intended, and it’s not uncommon to see static pressures drop by 30 psi or more when taking a dynamic reading. The reason for this is volume. If your airline can’t flow enough volume, you’ll never be able to maintain the proper pressure for correct air tool operation.
There’s usually plenty of pressure and volume in the air compressor tank at your shop, but how many bays feed off it? And what’s the diameter of the line or pipe that runs throughout the shop? How many corners does it turn and how many bays are fed by it before it reaches you? And finally, what’s the diameter of your air hose, and are your fittings rated to flow the proper amount of air?
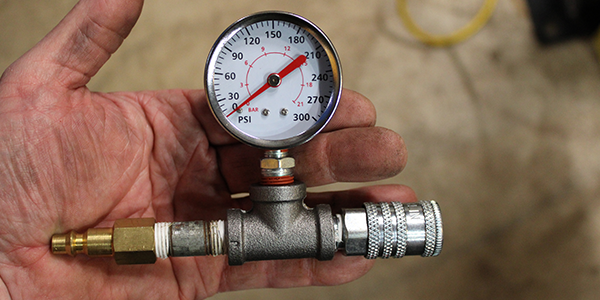
All these questions must be answered when a dynamic air pressure test proves you simply aren’t getting enough to make your air tools work as they should. To perform one, you first need to construct a test gauge (Figure 1) using a pipe tee, gauge and air fittings. Connect it to the end of your air hose and look at the pressure. This is your static pressure. Then connect your air tool and hold the trigger wide open. This is your dynamic pressure. If it’s too high, a regulator should be installed to limit the pressure. If it’s too low, then you’ll have to investigate the answers to the above questions to determine the cause of the problem.
I’ve been in many shops over the years, most of them without a pressure gauge on the supply lines in each bay, and I’ve never seen anyone perform a dynamic pressure test. But how real is it? I decided to find out and I had the perfect opportunity. My air tools haven’t been working very well at home lately, and it seemed obvious that they weren’t getting enough air, but I wanted to find out how bad it really was and why.
My compressor is only a small one but rated to provide 6 cubic feet per minute at 90 psi. My 1/2-in. impact recommends a 3/8-in. hose size, an operating psi of 90 and has an average air consumption of 3.5 cfm (cubic feet per minute). According to the specifications, the compressor should provide adequate output, and all my hoses are 3/8-in.
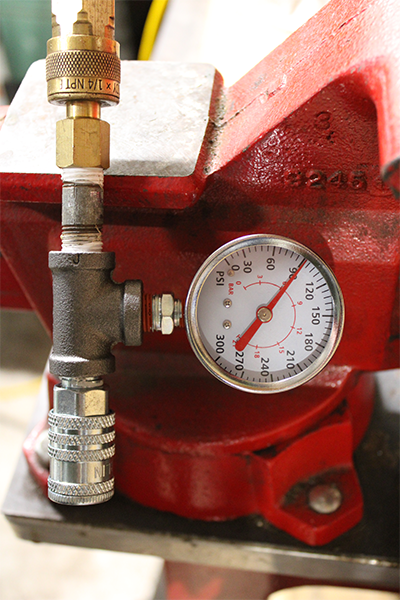
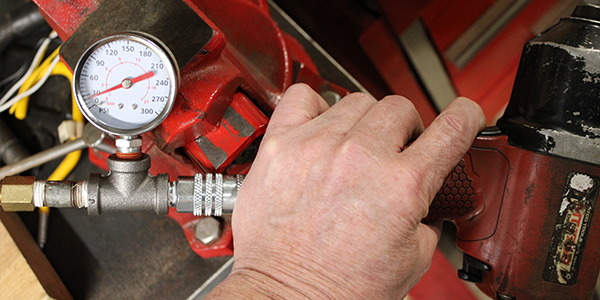
I connected the test gauge to the end of an air hose. I adjusted the regulator on the compressor until I had 90 psi of static pressure available at the hose (Figure 2) I connected my impact and pulled the trigger. I was certain I’d have considerable loss but was amazed to see the dynamic pressure drop to 20 psi (Figure 3).
Next, I adjusted the regulator on the compressor until I had 120 psi static pressure at the hose. I pulled the trigger on the impact once again, and the dynamic pressure immediately dropped to 40 psi, less than half of what the impact is rated to work at. There just wasn’t enough available air volume to maintain the pressure. It was clear I had a restriction somewhere, so I went straight to the compressor and connected the gauge directly to the outlet of the regulator. I adjusted the regulator to its maximum setting and the gauge read about 135 psi.
With my impact connected, I pulled the trigger and the dynamic pressure dropped immediately to less than 60 psi. It appeared as if I wasn’t going to have to look too far to find the problem. I was averaging approximately a 70-80 psi drop from static to dynamic pressure at all points.
I removed the regulator and installed the gauge in place of it, got a reading of about 140 psi pulled the trigger and finally had a dynamic psi of 100 a little higher than needed, but proof that the compressor output was adequate. In this case, the regulator was the culprit.
This was an extreme example, but a perfect one for demonstration. I bought the components to build my test gauge at a local hardware store for less than $20. It was money well spent. TS