The Toyota Venza was created to be something between a car and an SUV. Engineers at Toyota started with the Camry platform, but improved the brakes with larger rotors, dual piston calipers in the front, and a more advanced ABS and stability control system.

The key to servicing the brakes on the Venza is to pay attention to the details like the lubricants and rotor dimensions. And, technicians working on this brake system must realize that parts like the brake hardware and soft components like the guide pin boots have a limited lifespan.
Rotors
The front rotors have a minimum wear specification of 26 mm. And, with a new rotor spec of 28 mm, that leaves only 2 mm of material to wear before it is below specifications. The solid rear rotors have a minimum thickness of 9 mm and a new thickness of 10 mm.
To make up for the lack of material on the rotor, the Venza uses a ceramic/NAO friction material to control rotor wear. This type of friction material deposits a layer of friction material on the rotor’s surface that wears, but is also replenished by the brake pads.
The maximum allowable lateral runout for the front rotors is only 0.002”, while the maximum allowable lateral runout in the rear is 0.006”. The service information recommends using all five lug nuts tightened to 76 ft./lbs. before making a measurement with a dial indicator.
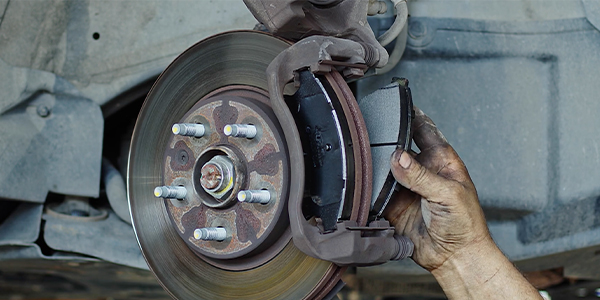
Pads and Calipers
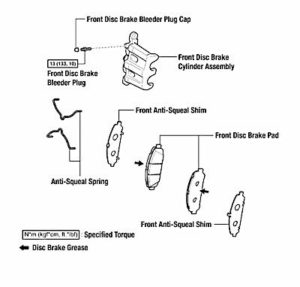
The front brake pads use spreader clips to push the pad away from the rotor. These clips help to reduce drag and eliminate noise.
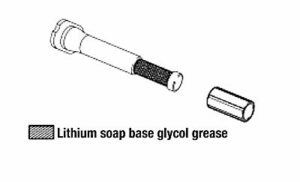
The calipers in the front and rear use guide pins. The boots are critical to the health of the pins. If the boots are damaged, moisture can enter into the cavity and corrode the pins. This contamination will eventually cause the caliper to seize. The guide pin is typically covered with an anti-corrosion plating. Note: Using a wire wheel to clean up the pin will remove this surface and cause premature corrosion. Always replace the pin if the coating has been removed or is corroded.
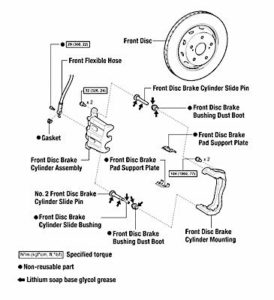
Lubricating the pins is critical for making the brake job last. Brake-caliper-specific grease is recommended. The grease needs to be able to hold up to the high temperatures and be compatible with the rubber material of the boots and bushings. Toyota recommends applying a light coating to the body of the pin and the sealing surfaces of the boots. If too much grease is used, it will expand and possibly dislodge the boots from the lip on the caliper bracket. In addition, the upper pins have a soft rubber bushing on the tip that should be removed so the surfaces under the bushing can be lubricated.
Bleeding
The Venza has an advanced ABS and stability control system. The system also controls electronic brake distribution and has a brake-assist feature to help the driver produce enough hydraulic force during a panic stop.
Pressure bleeding is recommended for removing air from the base brake system. If you are planning to perform a manual or pressure-bleeding procedure, never have the ignition on or the engine running during operation. Codes might be stored for a sudden loss of hydraulic pressure. If you are bleeding the ABS or master cylinder, use a scan tool to actuate the valves in the ABS HCU to remove all of the air.
Parking Brake
The Venza uses a drum-in-hat parking brake. The parking brake is applied using a foot pedal. Toyota specifies the pedal should fully engage after four to six clicks with moderate force. If it does not, you need to adjust the clearance between the parking brake shoes and hat.
The first step is to remove the nuts on the cable at the parking brake pedal so it has slack. Next, remove the wheel and the plug on the face of the rotor. The adjuster can be accessed through the hole at the six o’clock position. Extend the adjuster until the wheel locks and then back off the adjustment until the wheel turns freely. Reattach the nuts for the cable at the pedal. Torque the locking nut to 48 in./lbs.