Hyundai has been selling cars in the U.S. for more than 30 years. When the carmaker started operations, it had only one model, the Excel. Today, it has more than 10 models and a luxury car line called Genesis.
As the cars have evolved, so have the service information and opportunities for independent import repair shops. Here are some of the top tips.

MIL ON WITH DTCs SET AND FAIL-SAFE MODE, HARSH ENGAGEMENT
Models:
1999 Sonata; 2001 Elantra, Santa Fe and XG; 2003 Tiburon; 2005 Tucson; 2006 Azera; 2007 Entourage
Condition: The automatic transaxle on the above models may produce DTCs P0715-P0717 or P0720-P0722. An improperly functioning input speed sensor or output speed sensor may result in the following conditions:
• Check Engine Light on;
• Harsh P-R or P-D engagement shock;
• Transaxle in third gear fail-safe.
Correction: Replace the input and output speed sensors for the transmission.
Service Procedure:
1. Using a scan tool, check for the above-listed codes.
2. Observe the input and output speed sensor for any degradation or loss of signals with the scan tool. If a signal output is observed, go to Step 3.
3. Visually check the wiring harness for an open circuit or short circuit to ground. Check for a pinched harness at the PCM/TCM attachment bolts.
4. Disconnect the connectors at the input and output speed sensor and PCM/TCM. Check for bent pins or pins that are not fully inserted into the connector.
5. If a harness open or short is found, repair or replace the ECM control harness between the PCM/TCM and transaxle and go to Step 8. If not, go to Step 6.
6. P0722 only: For 2006 and later Sonata and Azera, and 2007 and later Santa Fe and Entourage vehicles, check the ground bolt, confirming that the threads are clean and the bolt is tight.

7. If the ground bolts are clean and tight, follow the repair procedures shown in the above chart.
8. Drive the vehicle for two key-on to key-off driving cycles.
9. Exchange a PCM or TCM from a similar year and model vehicle (excluding vehicles with an immobilizer).
If the codes:
– Set again, replace the control wiring harness.
– Do not set again, replace the PCM or TCM.

MDPS COUPLING REPLACEMENT
Models: 2013-’15 Elantra; 2013-’14 Sante Fe; 2012-’14 Azera; 2012-’15 Veloster
Condition: Driver may notice a “clicking” or “thud” noise when turning the steering wheel.
Solution: The motor-driven power steering (MDPS) assembly contains a flexible rubber coupling that wears out over time. Wear of the coupling does not affect the ability to steer or control the vehicle.
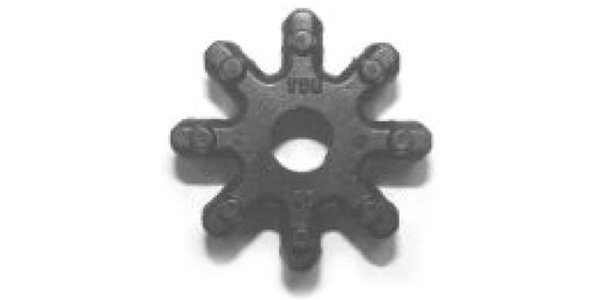
Parts: The revised part number is 56315-2K0000-FFF. The updated part offers increased durability. (see Fig. 1).
Replacement Tip: Clean out the coupling seating areas between the motor and column with compressed air so the new flexible coupling will seat.
POWER STEERING PUMP WHINE
Models: All
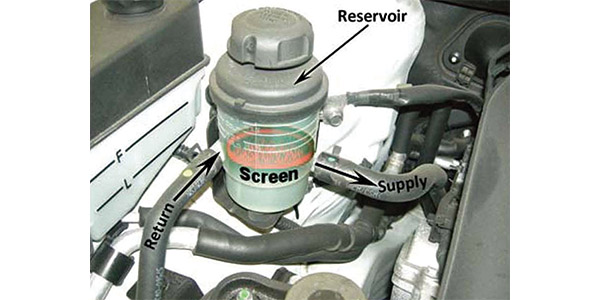
Condition: Before replacing a power steering oil pump for a “whining” noise, check the oil pump reservoir filter screen for contamination.
Cause: If the filter screen at the bottom of the oil pump reservoir is clogged, it may cause the pump to aerate and produce a “whining” noise.
Correction: If the filter screen is clogged, replace the reservoir and reconfirm the condition. It may be necessary to empty the power steering oil pump reservoir to properly inspect the screen.
See Fig. 2 for the location of the screen in the reservoir.
REAR BRAKE CALIPER REMOVAL
Models: 2007-’08 Elantra
Condition: The upper control arm obstructs access to the rear caliper lower mounting bolt. The service procedure below provides the steps necessary to remove the rear brake caliper.
1. Lift the vehicle off the ground and remove the rear wheel.
2. Slightly loosen the rear upper arm mounting bolt on the frame without removal.
3. Remove the rear upper arm mounting bolt at the knuckle.
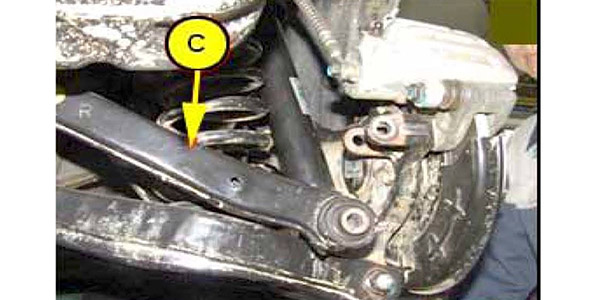
4. Lower the rear upper arm at the knuckle. See Fig. 3.
5. Remove the rear brake caliper assembly by unfastening the mounting bolts.
6. Reinstall all removed parts in the reverse order of removal.
ABS SYSTEM PUMP SELF-CHECK NOISE
Condition: The Anti-lock Brake System (ABS) performs a hydraulic pump self-check test during the first acceleration after each ignition switch cycle. During this test, the ABS computer tests the pump modulator valves, solenoids and motor for proper operation. This test occurs at a vehicle speed between 0 and 25 mph for all vehicle models. During this test, a slight noise (which customers may describe as a rattle, groan, growl, gurgling or buzz) may be heard, and a mild vibration may be felt through the brake pedal. The noise and vibration last approximately one second. If any system faults are found, the system will disable the anti-lock braking function, illuminate the ABS warning lamp and set a diagnostic trouble code (DTC).
The noise is the result of a normal function self-check test and cannot be eliminated by replacing the Hydraulic Electronic Control Unit (HECU). The HECU interactive pump self-diagnostic test and related activation noise do not affect the ABS operation. Use the following procedure to verify that the noise being heard is coming from the ABS self-check test.
Diagnostic Procedure:
1. To reproduce the self-check diagnostic noise, start the engine and accelerate the vehicle. A short “buzzing” noise will be heard between 0 and 25 mph. The noise varies in duration and can last up to about one second. The noise is very quiet and will not be noticeable. If it is not heard, shut off the ignition, and continue to step 2 to install chassis ears.

2. To amplify the noise, install a chassis ears clip onto one of the hard lines directly installed onto the HECU (see Fig. 4).
3. Plug the other end of the clip into the chassis ears control box. Note which port is used (plug is installed into port # 1 on the image shown).
4. Using the selection knob, choose the same port number into which the clip plug was installed.
Turn the volume knob to power the unit ON. Be sure the volume is turned loud enough to hear the noise clearly.
5. While listening with the chassis ears, start the engine and accelerate the vehicle to at least 25 mph to hear the self-check pump noise.
TIMING BELT TENSIONER INSTALLATION & SETUP
Models: 2006-’09 Tucson; 2007-’10 Elantra; 2007-’08 Tiburon
After performing a thorough analysis of the timing system on these vehicles, Gates engineers have determined a need to highlight proper installation and setup procedures of the timing belt tensioner. This tensioner is a spring-type automatic tensioner with eccentric adjustment for setting the initial tension.
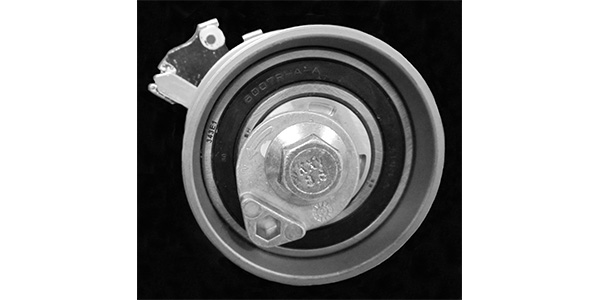
Tension in the drive is increased by rotating the eccentric counterclockwise, as indicated by the arrow stamped on the tensioner. OEM instructions indicate to rotate the eccentric counterclockwise using an Allen wrench until the pointer is centered in the window (see Fig. 5).
The instructions then dictate to torque the mounting bolt to the indicated specification. Torque the bolt to 32-40 ft. lbs. on Tucson models, and 17-22 ft. lbs. on Elantra and Tiburon models.
The torque procedure is as follows: Turn the mounting bolt clockwise while applying counterclockwise pressure on the tensioner via the eccentric with an Allen wrench.
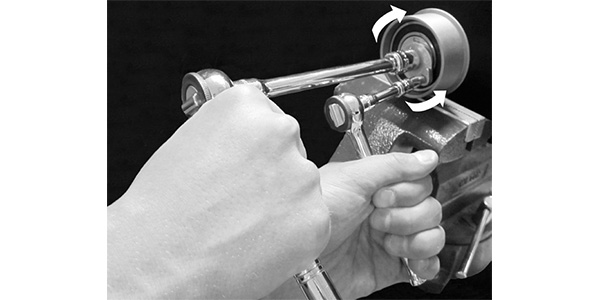
Note: The eccentric will attempt to rotate as the mounting bolt is torqued. Therefore, it is imperative to apply equal counterforce to the eccentric using an Allen wrench while torqueing the bolt (see Fig. 6).
Once the mounting bolt is torqued, verify the correct tension in the drive by turning the engine two complete revolutions. If the pointer is still centered in the window, proceed with reassembly. Otherwise, loosen the mounting bolt and repeat the above procedures.
Although this bulletin outlines the procedures for installing and setting up the timing belt tensioner, always verify all manufacturer-recommended procedures and torque specifications, as they are subject to change.
NO SPARK, NO INJECTOR PULSE
Models: 2002 Sonata 2.4 L
CKP sensor failure is common. The Identifix Hotline has had some cases of the timing belt shredding, and affecting or damaging the CKP sensor.
Test Procedures:
1. Verify the battery voltage to the CKP sensor on the pink wire.
2. Verify that the ground for the CKP sensor is good on the black wire — look for 0.05 volts or less.
3. Scope the CKP sensor on the yellow wire for a consistent 0-5 volt square wave signal.
4. Check for a possible timing belt shredding issue that is affecting the CKP sensor.