Customers may notice a rattle noise created by loose or corroded front exhaust pipe heat shields. This bulletin advises about the availability of heat shields as spare parts, preventing the need to replace the front exhaust pipe. This bulletin supersedes TSB-07-15-002REV, issued June 2007.
Affected Mitsubishi Vehicles
2004 – ‘11 Galant
2004 – ‘11 Endeavor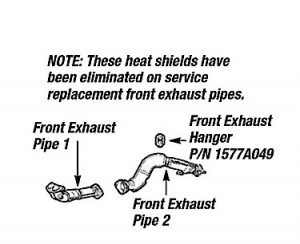
2006 – ‘12 Eclipse
2007 – ‘12 Eclipse Spyder
Procedure: Do not replace a front exhaust pipe to repair a heat shield rattle or other noise. Replace or remove only the affected heat shield(s) according to the following instructions. Refer to TSB-11-15-002 for heat shield replacement procedures.
For Galant and Eclipse/Eclipse Spyder equipped with 2.4L engines built before Dec. 4, 2006:
When performing repairs on the front exhaust pipe of these vehicles, replace the front exhaust hanger with the new heat-resistant part indicated.
- Remove the heat shields and clamps from Front Exhaust Pipe 1 in Fig 1.
- Remove three heat shields from Front Exhaust Pipe 2 in Fig. 1 as follows:
- Both rear heat shields and rear clamp.
- The bottom-front heat shield.
- Retain the top-front heat shield and secure it with two remaining clamps.
- Replace the front exhaust hanger with a new heat-resistant part.
Note: These heat shields have been eliminated on service replacement front exhaust pipes.
For all other vehicles:
- Determine which heat shield(s) is the source of the noise or rattle and replace them. Use a new sealing ring (where applicable) and gaskets when reinstalling front pipes (V6 only).
Galant and Eclipse/Eclipse Spyder 2.4L
- Replace heat shields. Torque the heat shield clamp bolts to 6.5 +/- 1.5 Nm (58 +/- 13 in.-lb.).
Endeavor
- Remove the front pipe to access the heat shields.
- Replace the heat shields. Torque heat shield clamp bolts to 6.5 +/- 1.5 Nm (58 +/- 13 in.-lb.).
- During reinstallation, torque the pipe connections to 49 +/- 4 Nm (37 +/- 2 ft. lb.).
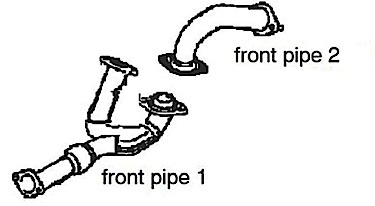
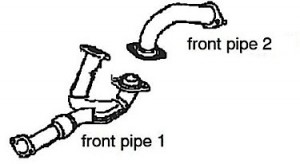
Galant and Eclipse/Eclipse Spyder 3.8L V6
- Remove front pipe 1 (“Y”) pipe in Fig. 2.
- Remove front pipe 2 in Fig 2.
- Replace the heat shields. Torque the heat shield clamp bolts to 6.5 +/- 1.5 Nm (58 +/- 13 in.-lb.).
- During reinstallation, torque all pipe connections to 49 +/- 4 Nm (37 +/- 2 ft.-lb.).